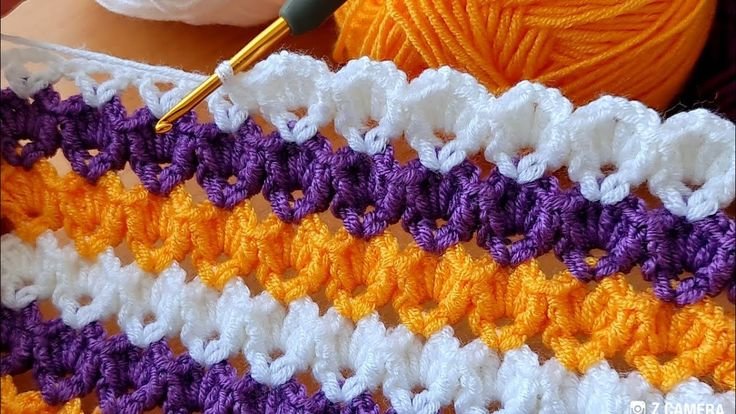
Welcome back to My Crafts Inspirations! Today, I’m excited to share a beautiful and textured crochet stitch that you’ll love the 3D Shell Stitch. This versatile stitch creates a stunning, raised texture that is perfect for various projects, such as baby blankets, scarves, shawls, and even pillow covers.
3D Shell Stitch Free Pattern
Whether you are a beginner looking to expand your skills or a seasoned crocheter, this pattern will add a delightful touch to your next project.
The 3D Shell Stitch is an eye-catching design that stands out due to its layered, shell-like appearance. It provides a textured look that feels luxurious, making it a fantastic choice for projects where you want to showcase unique stitch work.

3D Shell Stitch
Terminology
Before we start, let’s review some common crochet terms that will be used in this pattern:
- CH = Chain
- DC = Double Crochet
- RPT = Repeat
- SLST = Slip Stitch
- ST = Stitch
- FPDC = Front Post Double Crochet
- FPDC2TOG = Front Post Double Crochet Two Together
- SHELL = 3 DC, CH 1, 3 DC
- V-ST = DC, CH 2, DC
- PREV = Previous
Materials Needed
To begin, you’ll need the following materials:
- Yarn of your choice (any weight works, but medium or worsted weight yarn is great for a more defined texture)
- Corresponding crochet hook size (check your yarn label for recommendations)
- Scissors
- Tapestry needle for weaving in ends
3D Shell Stitch Pattern Instructions
Foundation Chain: Start by chaining 37, or any multiple of 4 plus 1. This will be the foundation chain for your project.
ROW 1
Make a DC in the 6th CH from the hook.
CH 2, then make another DC in the same CH (this creates your first V-ST).
RPT the following sequence: [Skip the next 3 CHs, then make a V-ST (DC, CH 2, DC) in the next CH].
Continue this sequence across the row.
At the end of the row, skip 2 CHs, and make a DC in the last CH.
CH 3, then turn your work.
ROW 2
Make a FPDC around the first DC of the previous row’s V-ST. This will help create the raised, 3D effect.
RPT the following sequence: [In the next V-ST space, create a SHELL (3 DC, CH 1, 3 DC). Then, make an FPDC2TOG around the last DC of the current V-ST and the first DC of the next V-ST].
Repeat this pattern across the row.
After the last SHELL, make an FPDC around the last DC of the previous row’s V-ST.
Finish the row with a DC in the top of the turning CH.
CH 3, and turn your work.
ROW 3
RPT the following sequence across the row: [Make a V-ST in the CH-1 space of each SHELL from the previous row].
Complete the row by making a DC in the turning CH.
CH 3, then turn your work.
Repeating the Pattern
To continue your project, repeat Rows 2 and 3. This creates a beautifully layered shell pattern with a textured look. For a finishing touch:
- End with a ROW 2 if you want a scalloped, wavy edge.
- End with a ROW 3 if you prefer a straighter edge.
Tips for Perfecting the 3D Shell Stitch
Tension Control: Maintaining consistent tension is key to ensuring your shells have a uniform appearance.
Yarn Choice: Opt for a yarn that showcases stitch definition well, such as cotton or a smooth acrylic blend.
Customization: You can easily customize this pattern by adjusting the foundation chain length (always using a multiple of 4 plus 1).
Final Thoughts
The 3D Shell Stitch is a fantastic choice for projects where texture and depth are the stars. With its versatile and visually appealing design, it’s sure to become a favorite in your crochet repertoire. Try it out on a small swatch first, then let your creativity flow as you incorporate it into your projects.
I hope this tutorial inspires you to try out this beautiful stitch pattern. Don’t forget to share your creations with us in the comments or on social media. Happy crocheting!
Video Tutorial
Feel free to leave a comment below if you have any questions or need further guidance on this pattern. I can’t wait to see what you create with the 3D Shell Stitch!
You might also be interested
You Are Here:
