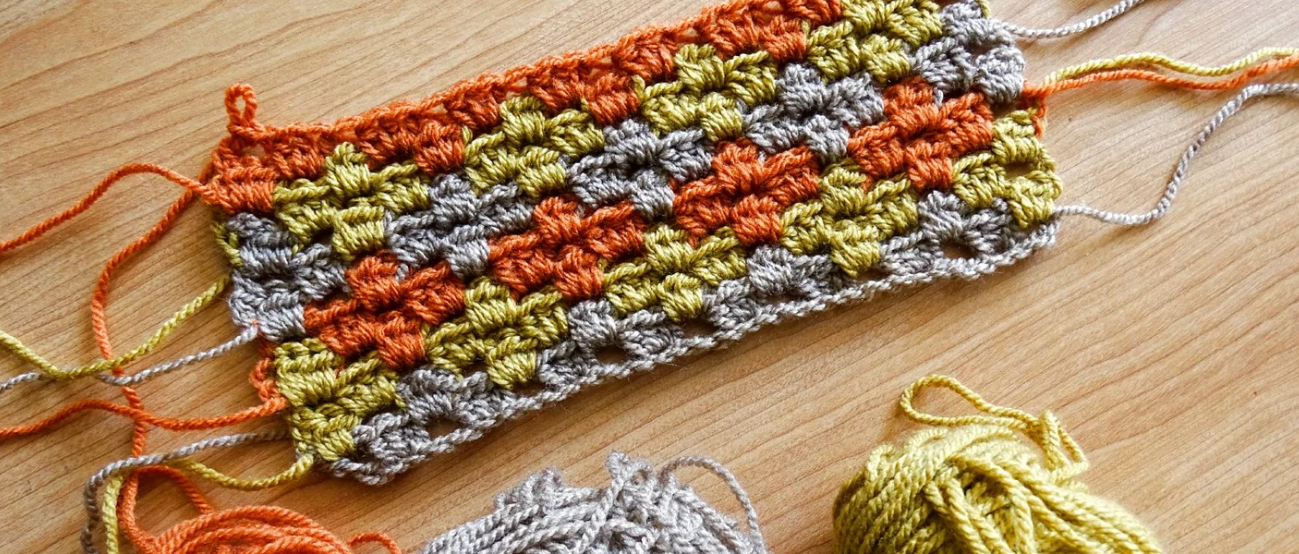
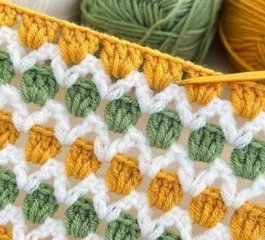
The Clover Crochet Stitch is a charming textured stitch that creates a repeating motif that resembles tiny clover leaves scattered across your fabric. This stitch combines groups of half double crochet stitches (HDC) with simple color changes to create a delicate and eye-catching design. It is a wonderful choice for blankets, baby afghans, scarves, cushions, and decorative crochet projects where you want a soft texture with a playful look.
Clover Crochet Stitch Pattern
Written byadmin in
What makes the Clover Stitch especially appealing is the way the alternating colors create small clover-like clusters throughout the fabric. Even though the finished design looks intricate, the stitch itself is surprisingly simple once you understand the repeating pattern. By working groups of HDC stitches into chain spaces and switching colors strategically, the clover shapes naturally appear as the rows build.
This stitch is also ideal for crocheters who enjoy experimenting with multiple colors and textured stitches. You can create beautiful combinations using soft pastels for baby projects, bright tones for playful blankets, or elegant neutrals for home décor items. Once you complete the first few rows, the pattern becomes very rhythmic and relaxing to crochet.
Clover Crochet Stitch Pattern
Abbreviations (US Terms)
ch – Chain
sl st – Slip stitch
YO – Yarn over
HDC – Half double crochet
sk a st – Skip a stitch
sk 2 sts – Skip two stitches
beg – Beginning
Stitch Multiple
The Clover Crochet Stitch is worked in multiples of:
3 + 1 stitches
Clover Crochet Stitch Instructions
Row 1 – First Color
HDC in the 4th chain from hook.
Work 2 more HDC in the same stitch, then ch 1.
Skip 3 stitches, work 3 HDC in the next stitch.
Repeat from * across the row.
End of Row Options
Because the stitch is worked with an odd number of stitches, the row may end in two ways:
Option 1: Ch 1, skip a stitch, HDC in the final chain.
Option 2: Work 3 HDC in the last space.
You will now introduce the second color.
Adding a New Color
To begin a row with a new color:
Chain 1 with the first color.
Pull the second color through the loop.
Chain 1 with the new color.
You are now ready to crochet with the new color.
Row 2 – Color Changes Begin
Ch 1 with the second color.
Work 2 HDC and ch 1 in the next space, crocheting over the unused yarn to carry it along.
(Alternate option: Ch 3 and work 3 HDC in the next space.)
Switch back to the first color.
Ch 1, then work 3 HDC and ch 1 in the next space, again crocheting over the carried yarn.
Repeat this alternating color pattern across the row.
End of Row
Work the final 3 HDC in the ending ch-2 space.
Ch 3 and turn.
If you end with a different color than expected, simply make sure you begin the next row using the correct color for the pattern.
Row 3
You may cut the first color and continue with the second color only.
Tip: Crochet over any carried yarn tails from the previous row to keep the back neat.
Work 2 HDC in the first space, ch 1.
Work 3 HDC and ch 1 in each space across the row.
End of Row
Ch 1, HDC in the ending ch-3.
Row 4
Introduce the third color.
Change to the third color and ch 1.
Pull up the second color again and ch 1.
Work with the second color while crocheting over the third color to carry it along.
Steps:
HDC 2 in first space
Switch to third color, ch 1
HDC 3 in next space
Continue the pattern:
Switch to second color, ch 1
HDC 3 in next space
Switch to third color, ch 1
HDC 3 in next space
Repeat across the row.
End of Row
Work the last 3 HDC in the ending ch-2 space.
Ch 2 and turn.
Row 5
You may cut the second color.
Using only the third color:
HDC 2 in the first space, ch 1.
Work 3 HDC and ch 1 in each space across the row.
End of Row
Ch 1, HDC in ending ch-3.
Row 6
Introduce the first color again.
Change to the first color and ch 2.
Crochet over the third color so it can be carried along.
Steps:
HDC 2 in first space
Switch to third color, ch 1
HDC 3 in next space
Repeat across the row:
Switch to first color, ch 1
HDC 3 in next space
Switch to third color, ch 1
HDC 3 in next space
End of Row
Ch 1, HDC in the ending ch-3.
Row 7
You may cut the third color.
Using the first color only:
HDC 2 in first space, ch 1.
Work 3 HDC and ch 1 in each space across the row.
End of Row
Ch 1, HDC in ending ch-3.
Repeat Pattern
Repeat Rows 3 through 7 to continue the Clover Stitch pattern.
Tips for Beautiful Clover Stitch Projects
The Clover Stitch really shines when you experiment with different color palettes. Here are a few ideas:
Soft Pastels: Perfect for baby blankets or nursery décor.
Green Variations: Emphasizes the clover motif beautifully.
Bright Colors: Creates a playful and vibrant crochet blanket.
Neutral Shades: Gives a modern and elegant textured fabric.
This stitch works wonderfully for:
Crochet blankets and afghans
Scarves and shawls
Cushion covers
Baby projects
Decorative crochet panels
The Clover Crochet Stitch is a fantastic stitch pattern for crocheters who enjoy texture and colorwork. Its repeating clusters form delicate clover shapes that give the finished fabric depth and personality. While the color changes may seem complex at first, the rhythm of the pattern quickly becomes enjoyable and relaxing.
You might also be interested
You Are Here: