Welcome to My Crafts Inspirations, where creativity knows no bounds, and every project is a canvas for your imagination to run wild. As the sun-kissed days of summer beckon, we invite you to embark on a crafting journey that will not only add a touch of seasonal charm to your home but also envelop you in the warmth of your creative spirit.
Creating a Stunning Summer Days Bed Runner
Written byadmin in
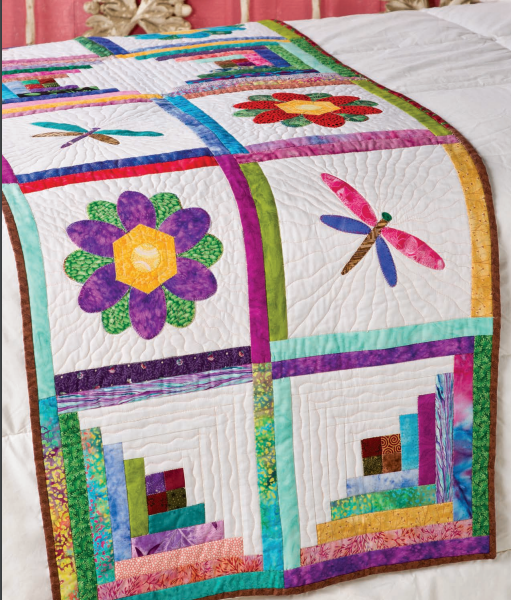
Our featured project today is the Summer Days Bed Runner a delightful creation that will infuse your bedroom with the vibrant hues of the season. Join us as we explore the steps to craft a bed runner that not only captures the essence of summer but also becomes a testament to your unique style and craftsmanship. Let the crafting adventure begin!
As the warm rays of summer extend their gentle touch, it’s the perfect time to infuse your living space with the vibrant spirit of the season. One delightful way to do this is by crafting a Summer Days Bed Runner. This charming and practical project not only adds a touch of seasonal flair to your bedroom but also provides a cozy layer for those warmer nights. Join us on a creative journey as we explore the steps to create a beautiful Summer Days Bed Runner that will bring the sunshine indoors.
- Project Details
- Skill Level: Intermediate
- Bed Runner Size: 84″ x 24″
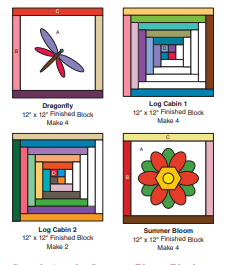
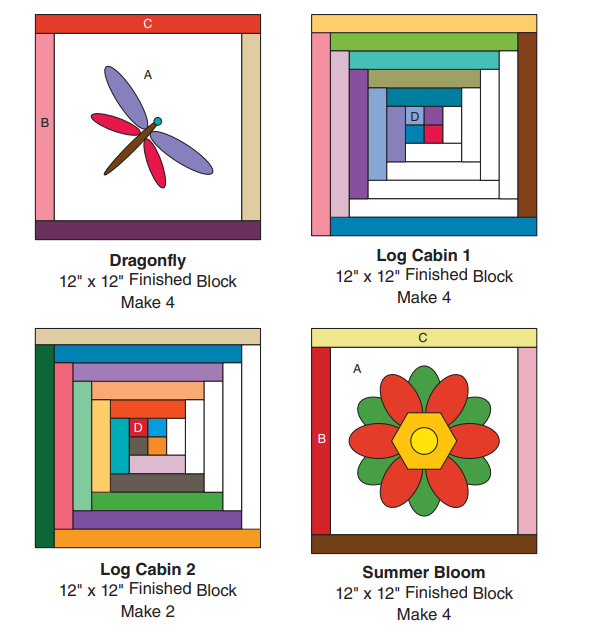
- Block Size: 12″ x 12″ Finished
- Number of Blocks: 14
Materials
- Scraps of light yellow and yellow fabric
- Assorted 1 1/2″-wide light and dark scrap strips in bright colors
- 4 large green scraps for leaves
- 4 large bright-color scraps for petals
- Assorted 2 1/4″-wide scrap strips to total 230″ when joined for binding
- 1 1/8 yards of white solid fabric
- 2 5/8 yards of backing fabric
- Batting measuring 92″ x 32″
- Thread
- 1 yard of 18″-wide fuse web
- Water-erasable marker
- Basic sewing tools and supplies
Cutting Instructions
Templates for cutting are located on the included pattern insert.
- Cut 24 squares measuring 1 1/2″ each from assorted light and dark scrap fabrics (D squares).
- Cut 16 strips measuring 1 1/2″ x 10 1/2″ each from assorted light and dark scrap fabrics (B strips).
- Cut 16 strips measuring 1 1/2″ x 12 1/2″ each from assorted light and dark bright-color scraps (C strips).
- Cut a variety of Log Cabin strips measuring 1 1/2″ wide by the scrap’s width from assorted scraps. Note: Strips are needed in increments from 3 1/2″ to 12 1/2″ for the Log Cabin blocks.
- Cut appliqué pieces according to the provided patterns, instructions, and the Fusible Appliqué sidebar on page 11.
- Cut seven strips measuring 1 1/2″ wide by the fabric’s width from white solid fabric for Log Cabin blocks.
- Cut two strips measuring 10 1/2″ wide by the fabric’s width from white solid fabric; then, subcut the strips into eight 10 1/2″ squares (A squares).
blocks
Completing the Summer Bloom Blocks
Utilizing the patterns provided on the insert, prepare the appliqué pieces for petals, leaves, hexagons, and flower centers, along with four A background squares, following the instructions on the patterns and consulting the Fusible Sidebar appliqué guide. Use a water-erasable marker to transfer dotted placement lines onto petal shapes.
Arrange and fuse six green leaf shapes onto a single A square, following the positioning guidance illustrated in Figure 1.
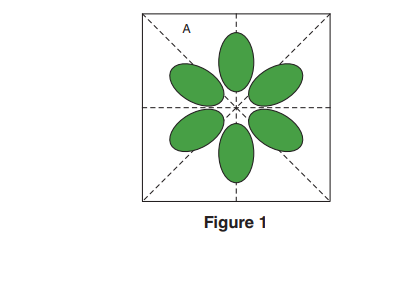
Figure 1
Place and fuse six bright-color petal shapes onto the previously fused A square, referring to Figure 2 for the accurate positioning of each piece.
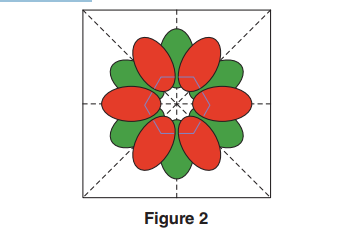
Figure 2
Position and fuse the hexagon and flower center onto the center of the fused petals, using the placement lines on the petals as guides. Refer to Figure 3 for proper positioning.

Figure 3
Complete the finishing touches by applying a narrow zigzag or buttonhole stitch along the edges of the shapes.
Choose two B strips and two C strips. Attach the B strips to opposite sides and the C strips to the top and bottom of the appliquéd A square to finalize one Summer Bloom block. Refer to the block drawing for guidance and press seams toward the strips.
Repeat steps 2–6 to create a total of four Summer Bloom blocks, each a unique testament to the beauty of the season.
Completing the Dragonfly Blocks
Use the patterns provided in the pattern insert to prepare dragonfly pieces and four A background squares for appliqué, following the instructions on the pattern pieces and consulting the Fusible Appliqué sidebar for guidance.
Arrange and fuse a dragonfly motif onto one A square, using Figure 4 as a reference for the precise positioning of each piece.
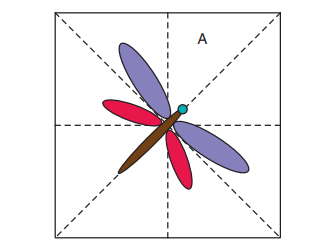
Figure 4
Achieve a polished finish by employing a narrow zigzag or buttonhole stitch along the edges of the shapes. Opt for variegated thread or thread that matches the fabrics for a seamless blend.
Choose two B strips and two C strips. Attach the B strips to opposite sides, and the C strips to the top and bottom of the applied A square, completing one Dragonfly block. Refer to the block drawing for assistance and press seams toward the strips.
Repeat steps 2–4 to craft a total of four Dragonfly blocks, each showcasing the intricate beauty of this winged creature. The end result will be a set of blocks that capture the essence of nature’s elegance.
Completing the Log Cabin Blocks
Begin by choosing and combining four D squares to form a Four-Patch unit, following the illustration in Figure 5; press the unit. Duplicate this process to create a total of six units.
Take a 1 1/2″-wide strip of white solid fabric; position a Four-Patch unit on the strip with right sides together. Turn over and stitch as depicted in Figure 6.
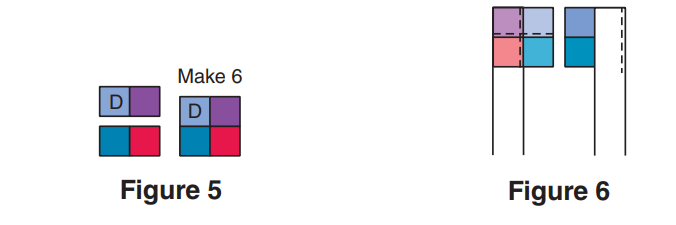
Figure 5, 6
Continue adding the Four-Patch units to the strip, leaving a small space between units as you stitch, as illustrated in Figure 7.
Trim the strip to align with the Four-Patch units, following the guidance in Figure 8. Press seams toward the strips after trimming to finish the first round for all Log Cabin blocks.
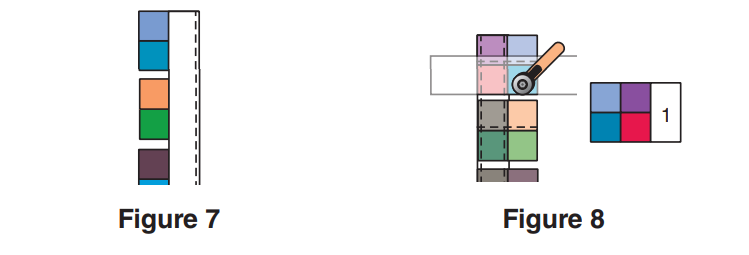
Figure 7,8
Choose four pieced units and stitch each to the remaining white solid strip. Trim and press as outlined in steps 3 and 4 to add strip 2, referring to Figure 9.
To finalize one Log Cabin 1 block, select one pieced unit and one scrap strip. Sew the scrap strip to the next side of the pieced unit to add piece 3, following the instructions in Figure 10. Press the seam toward piece 3.
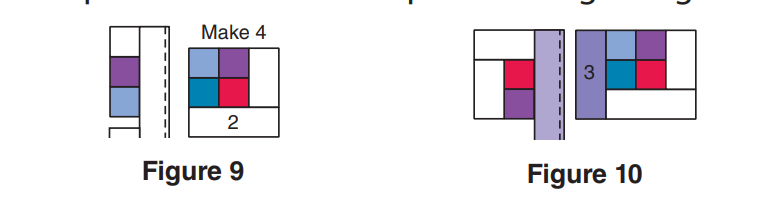
Figure 9, 10
Continue adding scrap strips and white solid strips to the pieced units using the same methods to complete one Log Cabin 1 block. Refer to Figure 11 for the order of piecing and placement of fabrics.
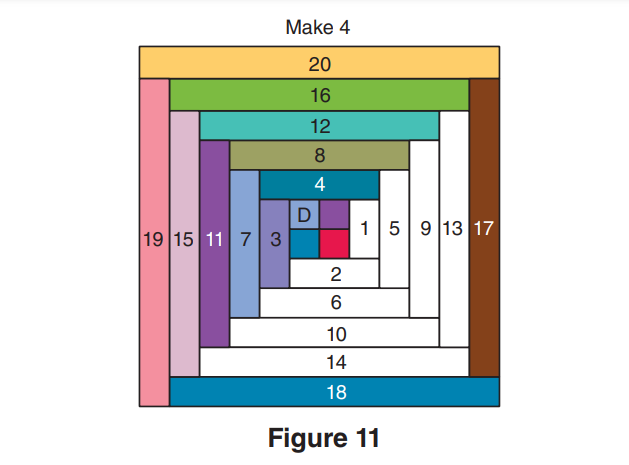
Figure 11
Repeat steps 6 and 7 to create a total of four Log Cabin 1 blocks.
Conclude by crafting two Log Cabin 2 blocks, employing the same procedures outlined in steps 1–8. However, use white solid strips on only one side of the block. Consult Figure 12 for the order of piecing and placement of fabrics.
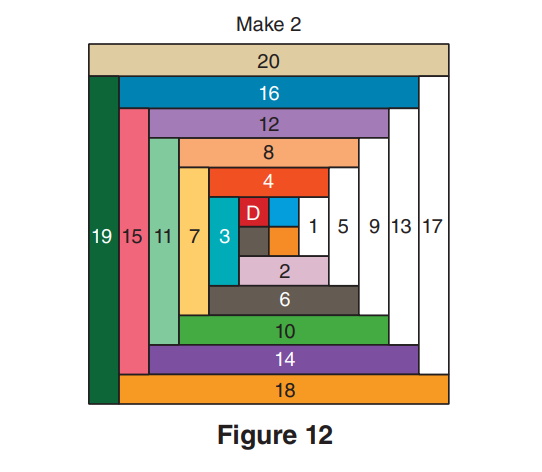
Figure 12
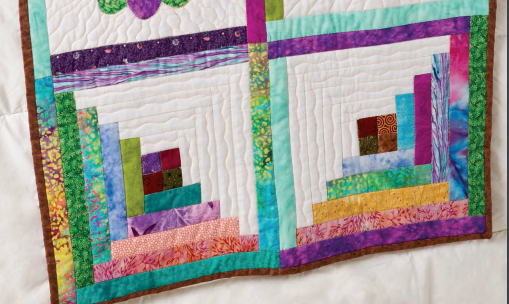
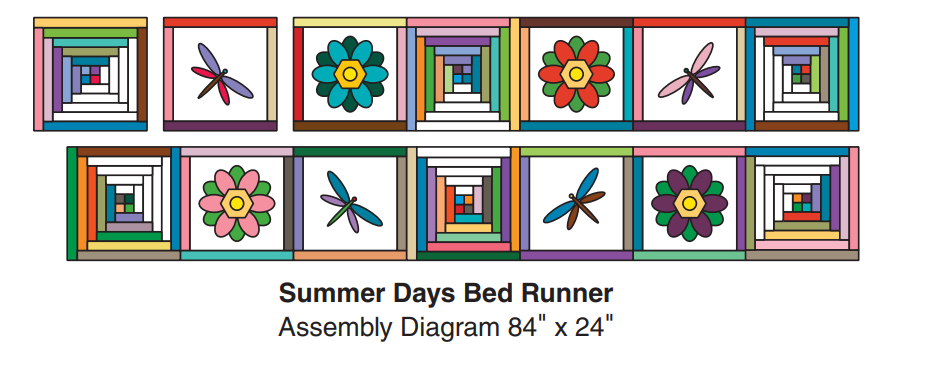
Completing the Bed Runner Top
Organize and connect the Log Cabin 1, Log Cabin 2, Summer Bloom, and Dragonfly blocks into two rows, following the Assembly Diagram for proper positioning. Press the seams for a polished finish.
Combine the rows as individual pieces to finalize the bed runner top. Press the assembled top for a smooth and cohesive look.
Completing the Quilt
Assemble the quilt by placing the batting between the pieced top and the prepared backing piece. Secure the layers together with pins or adhesive. Quilt the layers as desired, either by hand or machine.
Once the quilting is finished, trim the batting and backing fabric to align with the raw edges of the pieced top.
Join the binding strips on the short ends to create a long strip, pressing the seams open. Fold the strip with wrong sides together along its length and press.
Attach the binding to the edges, mitering the corners and overlapping the ends. Fold the binding to the back side and stitch it in place to complete the quilt with a polished finish.
Diagram
Crafting a Summer Days Bed Runner is a delightful way to usher in the warmth and vibrancy of the season into your living space. Whether you opt for bold patterns, cheerful colors, or subtle textures, your bed runner is sure to be a visual highlight that captures the essence of summer. Embrace your creative spirit and let the sunshine linger a little longer in your home with this charming and practical craft project.
You might also be interested
You Are Here: