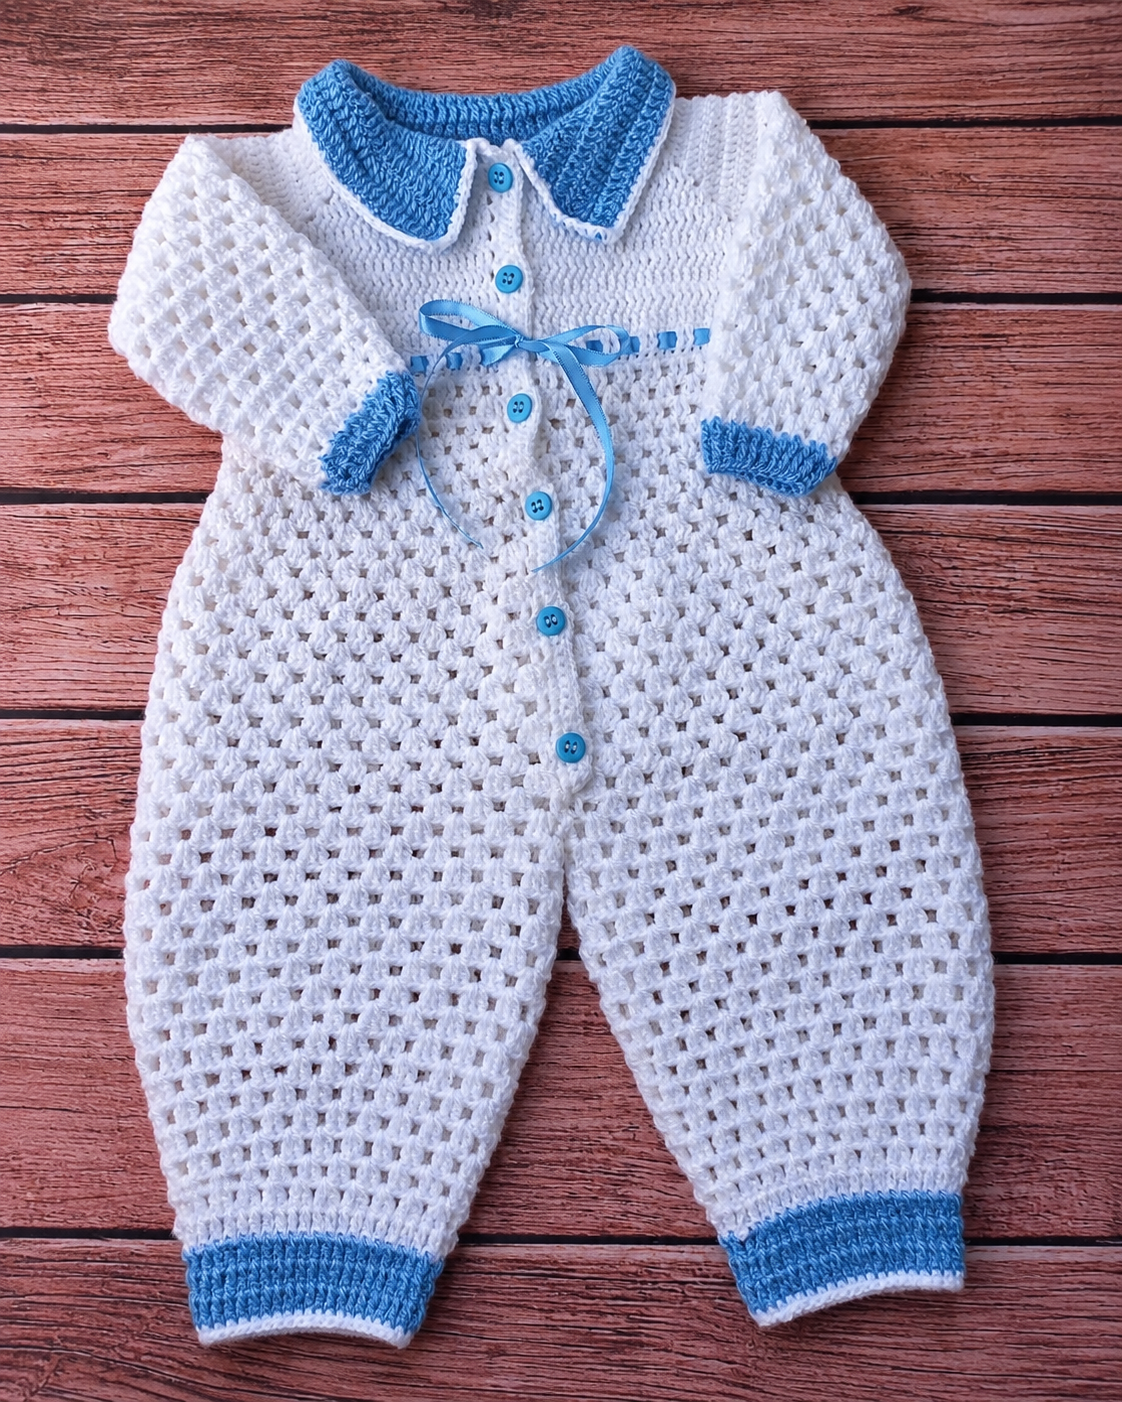
Look just below the yoke of this crochet baby romper and you can see how the shaping works. The first rows have little pairs of double crochets. Farther down, the pairs give way to groups of three. That extra stitch in each block gives the romper room through the diaper area while keeping the button front straight. The same idea works in reverse to bring the legs in toward the ankles.
Crochet Baby Romper Free Pattern
Written byadmin in
The romper begins at the neckline. You’ll crochet the fronts and back together, leave two openings for the sleeves, then join the body just above the crotch. The blue-and-white cover shows one way to style the piece. The instructions below follow the scalloped collar and button edging from the Portuguese video tutorial Macacão Crochê Bebê 0 a 3 meses. This English adaptation was prepared from its captions and has not been independently test-crocheted.
Before starting the second leg, clip a removable stitch marker into the first round of blue or other contrast ribbing on the finished leg. That little marker gives you a fixed point for comparing the two cuffs. Once both legs are complete, lay them side by side, line up the color changes, and let the ribbing relax. The lower edges should meet without stretching either cuff.
Crochet Baby Romper Free Pattern
Size and supplies
The tutorial is labeled 0–3 months. The maker describes the finished sample as fitting approximately 1–3 months. It measures 44 cm (17¼ in) around the chest and 43 cm (17 in) in overall length. The stated sleeve measurement is 24 cm (9½ in), but its starting point is unspecified. Follow the sleeve round counts and compare the garment with a romper that fits your baby.
- One 100 g ball of Círculo Mais Bebê, 500 m (547 yd), tex 200, in the main color. The tutorial uses salmon, shade 214.
- Leftover matching-weight yarn for the contrast trim. For a palette like the cover, use white for the body and blue for the trim.
- A 2 mm crochet hook, or 2.5–3 mm if you crochet tightly.
- Stitch marker, small buttons, sewing needle and thread, yarn needle, and scissors.
Tension check. The maker’s 72 foundation chains measure approximately 31 cm (12¼ in) before the turning chains. No stitch-and-row gauge is given. Measure the chain relaxed, then check the chest again after joining the underarms.
US crochet terms
ch = chain, sc = single crochet, hdc = half double crochet, dc = double crochet, sl st = slip stitch, st = stitch, BLO = back loop only. A block is a group of individual double crochets. Finish each dc before beginning the next.
For a front post double crochet (FPdc), yarn over and insert the hook from front to back to front around the post of the stitch below. Finish as for dc. For a back post double crochet (BPdc), insert the hook from back to front to back around the post. For the picot used here, ch 3 and sc into the base of those chains.
1. Crochet the raglan yoke
Row 1. Ch 72 loosely, then ch 3 more. Dc in the fifth ch from the hook. Count the turning ch as the first dc. Continue along the foundation until the first front has 11 dc. Ch 2 between each of the following sections, working into the very next foundation ch after each ch-2 corner.
| First front | Sleeve | Back | Sleeve | Second front |
|---|---|---|---|---|
| 11 dc | 14 dc | 22 dc | 14 dc | 11 dc |
You should have 72 dc and four ch-2 corners.
Rows 2–8. Turn. In the first st, work sc and ch 2 to stand in for the first dc. Dc across each section, working through the back loop for the ridged texture. Work the first and last stitches through both loops. At each corner, work 2 dc in the back loop of the first chain, ch 2, then work 2 dc in the back loop of the second chain. For a smooth yoke, work through both loops across and place (2 dc, ch 2, 2 dc) in each corner space. Finish with eight yoke rows, including Row 1.
Row 9, divide for sleeves. Turn and work across the first front. Bring the first and second corners together. Work 1 dc through both corner spaces together, then 1 dc in the second space alone. This leaves the sleeve stitches free. Dc across the back and join the next two corners in the same way. Finish across the second front.
Foundation for the body. Ch 1, turn and sc in each dc through both loops. Check for 104 sc. The underarm joins contribute two stitches apiece.
2. Shape the body with open blocks
Work flat, turning after each row. The turning ch 3 counts as the first dc. Keep two edge stitches at each end for the front opening.
Body Row 1. Ch 3, dc in the next st. Repeat [ch 1, skip 1 st, dc in each of the next 2 sts] across. You’ll have 35 pairs of dc and 34 ch-1 spaces.
Body Row 2. Work the two edge dc. Work 2 dc in the first ch-1 space. Repeat [ch 1, 2 dc in the next space] across. After filling the last space, dc in each of the last 2 sts. The edge pair sits directly beside a block, giving four adjacent dc at each end.
Body Row 3. Work the two edge dc, ch 1, then work 2 dc in the first space. Continue with [ch 1, 2 dc in the next space]. After filling the last space, ch 1 and dc in each of the last 2 sts.
Rows 4–6. Repeat Row 2, then Row 3, then Row 2. Notice where each new row begins. If there is a chain space directly beside the edge pair, fill it immediately. If a solid block sits there, ch 1 to cross it before filling the first space. Mirror that spacing at the far edge. Keep this arrangement as the blocks grow wider.
| Body rows | Blocks to work between the two edge stitches |
|---|---|
| 7–9 | Alternate 3 dc in one space and 2 dc in the next, with ch 1 between blocks. Begin Row 7 with a 3-dc block. |
| 10–20 | Work 3 dc in every space, with ch 1 between blocks. |
3. Join the body and divide the legs
Bring the lower ends of the front opening together and slip stitch to join. Leave the front opening above this point free. Make one full setup round of 3-dc blocks with ch 1 between them, forming the first block at the front join. Join with a sl st to the top of the starting ch 3.
Use the front-join block as your starting landmark. Exclude this block from the count. Count 16 blocks and mark the center dc of the 17th block. There should be 16 blocks on the other side between the marker and the front block.
First leg, Round 1. At the front join, ch 3 and ch 1. Work 3 dc in each space along the first half, with ch 1 between blocks. After the block immediately before the marker, ch 1 and dc in the marked center st. Insert the hook at that same point and catch the starting point at the front to work one more dc through the two points together. Join with a sl st to the top of the starting ch 3. The stitches on the other half are reserved for the second leg.
4. Finish the legs
Count the dividing round as Round 1 of the leg. Close each round with a sl st. To begin a block in a space, slip stitch into the space, ch 3 and add the remaining dc. If you begin over a block, ch 3 and ch 1, work around, then complete the starting block beside the initial ch 3 before joining. This keeps the gaps staggered.
| Leg rounds | Instructions |
|---|---|
| 1–6 | Work 3-dc blocks with ch 1 between blocks. |
| 7–10 | Alternate 2-dc and 3-dc blocks with ch 1 between blocks. |
| 11–13 | Work 2-dc blocks with ch 1 between blocks. |
| 14 | Dc in each dc, skipping every ch-1 space to draw in the ankle. |
| 15 | BPdc around each stitch. |
| 16–21 | Join the contrast color. Alternate FPdc and BPdc around. On each following round, work front posts over front posts and back posts over back posts. |
Second leg. Attach the main yarn at the marked center st. Ch 3 and ch 1, then work the first round across the reserved half. Join the front and back points at the crotch as for the first leg. Follow the same round counts and cuff instructions. Weave in the ends, closing any small gap at the crotch.
5. Add the sleeves
Attach the main yarn at the center underarm. Ch 3 and work 2 dc in the same spot for the first block. Ch 1, then dc in each of the first 3 sleeve stitches. Repeat [ch 1, skip 1 st, dc in each of the next 3 sts] around, leaving a ch-1 gap between the final block and the underarm block. Join with a sl st. Check for 12 blocks, including the underarm block.
| Sleeve rounds | Instructions |
|---|---|
| 1–9 | Work 3-dc blocks with ch 1 between them. Round 1 is included. From Round 2, place each block in a chain space. |
| 10–14 | Alternate 3-dc and 2-dc blocks. |
| 15–16 | Work 2-dc blocks. Keep ch 1 between blocks throughout. |
| 17 | Dc in every dc. Work 1 dc in every other ch-1 space, skipping the spaces in between. With 12 blocks, this gives 30 dc. |
| 18 | BPdc around each stitch. |
| Cuff | Change to the contrast color and work 5 or 6 rounds of alternating FPdc and BPdc, matching the posts on each round. |
Repeat for the second sleeve. Use the same number of cuff rounds on both wrists.
6. Edge the button front
Join yarn at the bottom of one front edge. Ch 1 and work 2 sc into the first row end. In the next row end, work (3 dc, picot, 3 dc) for a scallop. Skip one row end, work 3 sc into the next, then make another scallop in the following row end. Continue this sequence up the front, finishing with 3 sc at the neckline.
Sc around the neckline. Continue down the opposite front, placing 2 sc in each row end. The buttons will sit on this plain edge and fasten through the scallops. Test one button for fit, overlap the fronts and mark its position through the scallop before sewing. Repeat at evenly spaced scallops and secure each button firmly.
7. Crochet the fold-over collar
Row 1. With the inside of the romper facing you, leave 3 edge stitches free at the front and join yarn at the neckline. Ch 3 and work dc in the back loop across the neckline. The free loops form the fold line.
Row 2. Turn. Sc in the first st and ch 1. Skip 2 sts, then work (3 dc, ch 2, 3 dc) in the next st. Skip 2 sts and sc in the next. Continue alternating shells and single crochets with 2 skipped sts between them. Finish with a dc at the far edge.
Row 3. Turn. Sc in the first st and ch 1. In the ch-2 space of each shell, work (4 dc, ch 2, 4 dc). Go directly from one shell to the next. Fasten off.
Collar edging. Rejoin yarn at a short edge. Work hdc evenly along the row ends. Across the scalloped edge, place 1 hdc in each gap between adjacent dc within each four-stitch group, giving three hdc along each side of a shell. At each ch-2 tip, work (hdc, picot, hdc). Finish the opposite short edge and weave in the ends.
For the white-and-blue look on the cover, carry the cuff color up to the collar and use matching buttons. The cover features a smooth collar and a ribbon, while the tutorial finishes with scallops. A small embroidered bow just below the yoke is another way to repeat the blue at the center front. Once the collar is folded down, lay the romper flat and button it from neckline to crotch to check that the two fronts meet evenly.
You might also be interested
You Are Here: