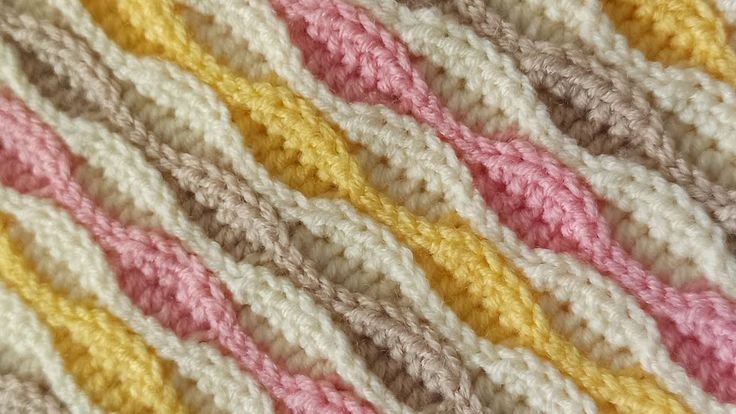
The Wave Stitch is a beautiful and textured crochet pattern that creates a gentle, undulating effect. This stitch is perfect for blankets, scarves, and other cozy projects. The unique texture comes from alternating slip stitches (SLST) and half double crochets (HDC), worked in the back loops only.
How to Crochet the Wave Stitch
Written byadmin in
If you’re looking for a stitch that adds a flowing, rhythmic design to your crochet projects, the Wave Stitch is an excellent choice. The pattern is easy to learn and works up quickly, making it suitable for beginners who want to experiment with texture and stitch definition. The slip stitches create the valleys, while the half double crochets form the peaks, producing an eye-catching and dynamic wave effect.
One of the best things about the Wave Stitch is its versatility. It can be used for everything from blankets to wearable accessories and even home decor projects. Plus, by changing up the colors, you can create a stunning visual effect reminiscent of ocean waves or rolling hills.
Wave Stitch
In this tutorial, you’ll learn how to crochet the Wave Stitch with step-by-step instructions. Grab your favorite yarn and hook, and let’s get started!
Materials Needed
- Yarn of your choice
- Crochet hook that matches your yarn weight
- Scissors
- Tapestry needle (for weaving in ends)
Wave Stitch Pattern
Before starting, here are the abbreviations used in this pattern:
Abbreviations
- CH – Chain
- SLST – Slip Stitch
- HDC – Half Double Crochet
- SP – Space
- ST – Stitch
- RPT – Repeat
Pattern Notes
- The stitch pattern is worked in multiples of 10 + 6.
- You will work in the back loops only to enhance the texture.
- For a practice swatch, start with 46 chains.
Step-by-Step Instructions
Foundation Chain
Make 46 chains (or any multiple of 10 plus 6 if adjusting size).
Row 1
SLST in 2nd chain from the hook and next 4 chains.
Repeat [HDC in the next 5 chains, SLST in the next 5 chains] to the end.
Turn your work.
Row 2
SLST in the first 5 stitches.
Repeat [HDC in the next 5 stitches, SLST in the next 5 stitches] to the end.
CH 2, turn your work.
Row 3
(CH 2 counts as the first stitch) HDC in the next 4 stitches.
Repeat [SLST in the next 5 stitches, HDC in the next 5 stitches] to the end.
CH 2, turn your work.
Row 4
HDC in the next 4 stitches.
Repeat [SLST in the next 5 stitches, HDC in the next 5 stitches] to the end.
Turn your work.
Row 5
SLST in the first 5 stitches.
Repeat [HDC in the next 5 stitches, SLST in the next 5 stitches] to the end.
Repeat rows 2-5 until you reach your desired height.
Tips for Success
Always work in the back loops only to maintain the wave effect.
The slip stitches create the valleys while the half double crochets create the peaks.
Keep a loose tension on the slip stitches to prevent the fabric from becoming too tight.
Uses for the Wave Stitch
This versatile stitch is ideal for various projects, including:
- Blankets – Create a soft, textured afghan.
- Scarves & Cowls – Add a cozy, wavy effect to winter wear.
- Pillows & Home Decor – Use this stitch to create stylish cushion covers.
- Baby Items – Make a delicate, wavy baby blanket.
The Wave Stitch is a fun and rewarding pattern to crochet. With its unique texture and rhythmic flow, it’s an excellent choice for beginners and experienced crocheters alike. Try experimenting with different yarn colors to highlight the beautiful waves!
Video Tutorial:
Do you have any questions or want to share your Wave Stitch creations? Leave a comment below! Happy Crocheting!
You might also be interested
You Are Here: