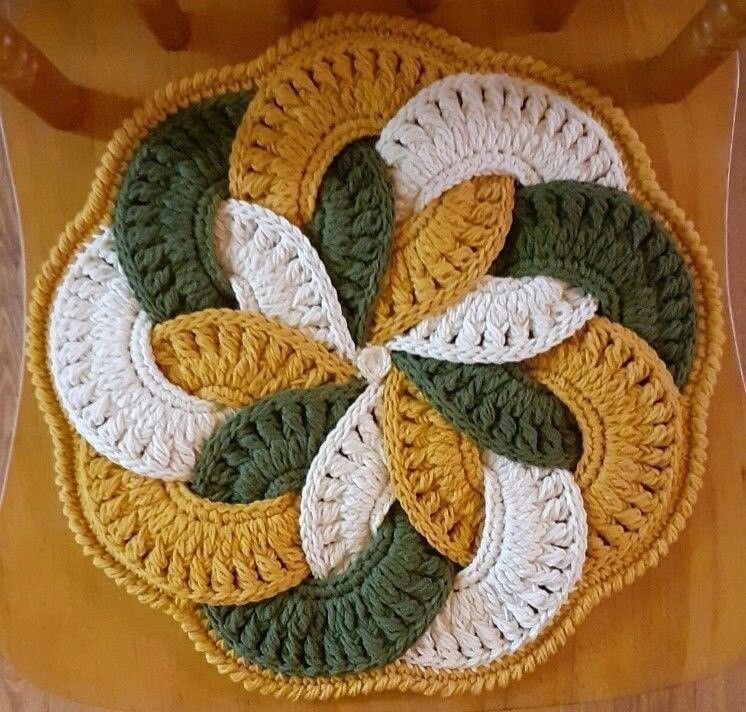
Crochet motifs are a delightful way to showcase your creativity while mastering intricate patterns. These small, versatile pieces can be used individually as table decor or joined together to create larger projects like blankets, shawls, or wall hangings.
Japonese flower Crochet Motif
Whether you’re a seasoned crocheter or just beginning your journey, crafting motifs allows you to experiment with textures, colors, and stitch combinations. The process is both satisfying and rewarding, as each completed motif is a mini work of art.
This guide walks you through creating a beautiful crochet motif with clear instructions and a step-by-step approach. Using accessible materials and straightforward techniques, you’ll produce motifs that can stand alone or combine seamlessly into a cohesive design. With a few basic supplies and a touch of patience, you’ll bring your crochet vision to life in no time.

Japonese flower Crochet Motif
Materials Needed:
Yarn: Mercedes or similar yarn of your choice
Crochet Hook: 1.75 mm or any size suitable for your yarn
Scissors
Tapestry Needle: For weaving in ends
Step 1: Create the Foundation Chain
Start by making a slip knot on your hook.
Chain 33 stitches to form the foundation chain.
Join the chain into a circle by inserting the hook into the first chain and using a slip stitch.
Step 2: Work the First Round (Single Crochets)
Insert the hook into each chain and create 33 single crochets (SC) around.
At the end of the round, join with a slip stitch into the first single crochet.
Step 3: Start the Cluster Stitches (Second Round)
Chain 2 (counts as the first stitch).
Yarn over, insert the hook into the same stitch, and pull up a loop.
Yarn over, pull through two loops twice to complete a double crochet (DC).
Chain 1 to create a space.
Move to the next stitch and create a cluster stitch:
Yarn over, insert the hook into the stitch, pull up a loop, and pull through two loops (leave the last loop on the hook).
Yarn over, insert the hook into the same stitch, pull up another loop, and pull through two loops.
You now have three loops on the hook; yarn over and pull through all three loops.
Chain 1 and repeat the process in each stitch around.
Step 4: Complete the Round
At the end of the round, count the clusters to ensure you have 33 clusters.
Join the last cluster to the top of the first stitch with a slip stitch.
Step 5: Continue the Pattern for Additional Rounds
Chain 2 to start the new round.
Repeat the cluster stitch pattern, working over the spaces between clusters in the previous round.
Continue for as many rounds as needed to complete the motif.
Step 6: Create Multiple Motifs
Repeat Steps 1–5 to make 8 motifs in total.
Use different yarn colors for variety or repeat the same color combinations for a cohesive look.
Step 7: Join the Motifs
Align the motifs edge to edge.
Use slip stitches to join the edges of adjacent motifs.
Step 8: Add the Border
With white yarn (or a contrasting color), attach the yarn to any edge.
Crochet 16 single crochets (SC) along each side of the motifs.
Continue around the entire piece, ensuring consistency in stitch count along the edges.
Step 9: Finish and Weave in Ends
Fasten off the yarn securely.
Use the tapestry needle to weave in all loose ends.
Final Step: Enjoy Your Beautiful Motif Project!
Display your finished crochet motifs as table décor, join them into a blanket, or use them as part of a larger crochet project.
If you need additional help with any of the steps, let me know!
Video Tutorial:
Creating crochet motifs is more than just a crafting activity—it’s a therapeutic and artistic endeavor. Each stitch you make builds toward a piece that reflects your dedication and personal flair. By mastering the steps in this guide, you’ll have the confidence to tackle more complex projects and even design your own patterns.
You Are Here: