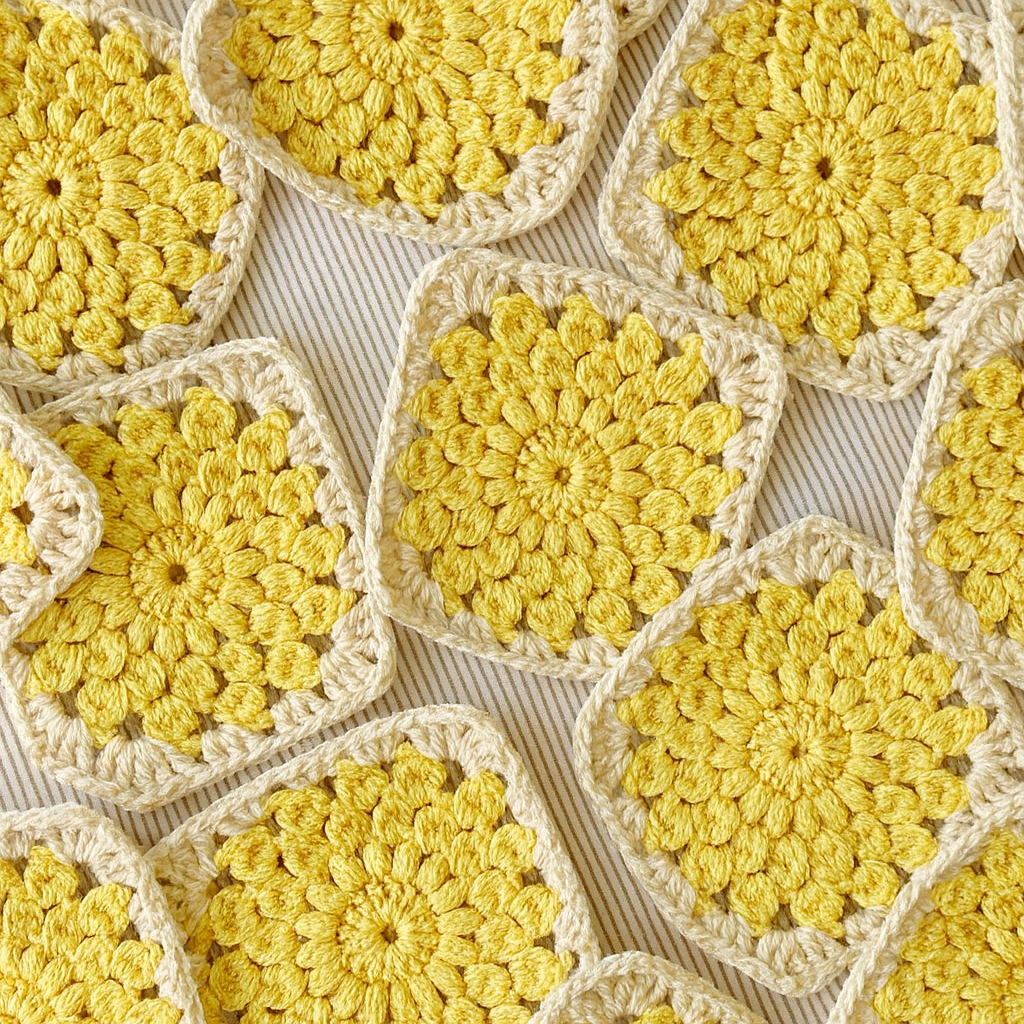
Granny squares are timeless in the crochet world, and the Large Sunburst Granny Square takes this classic idea to the next level. With its bold, radiant center and layered rounds of puffs and clusters, this design adds depth and style to any project. Whether you’re planning a cozy blanket, a vibrant throw, or even decorative pillow covers, these squares are the perfect way to combine color, texture, and creativity.
Large Sunburst Granny Squares – Free Crochet Pattern
Written byadmin in
Crocheting with granny squares never goes out of style, and the sunburst version offers a refreshing, modern take on the beloved classic. These squares feature textured puffs, bold clusters, and radiant centers that resemble little suns, making them ideal for projects that radiate warmth and charm. The beauty of this pattern is its versatility—you can create blankets, throws, or even combine a few motifs into unique home décor items.
The sunburst style works beautifully with bold, contrasting shades, but it also shines in subtle pastels or earthy tones. The joy of this project lies not only in making the squares but also in arranging them into your own unique pattern. Let’s dive into the steps for creating these stunning motifs.
Large Sunburst Granny Squares
Materials You’ll Need
Worsted weight yarn in multiple colors (Color A for centers, Color B for joining/borders, and any other colors of your choice).
Crochet hook suited to your yarn (commonly 5.0mm/H-8 or 5.5mm/I-9).
Yarn needle for weaving in ends.
Scissors.
Abbreviations (US Terms)
ch = chain
sl st = slip stitch
st(s) = stitch(es)
dc = double crochet
hdc = half double crochet
tr = treble crochet
puff = puff stitch
cl = cluster stitch
Large Sunburst Granny Square Pattern
You will need to make 63 sunburst squares (or as many as needed for your desired blanket size).
Round 1
With Color A, ch 5 and join with sl st into the first ch to form a ring.
Ch 2, then work 15 dc into the ring (16 dc total).
Join with a sl st to the top of the first dc (not the ch-2).
Do not fasten off.
Round 2
Ch 1, puff in the same st, ch 1.
Work [puff, ch 1] in each st around (16 puff stitches).
Join with a sl st into the ch-1 space between the first two puff stitches.
Do not fasten off.
Round 3
Ch 2, into the same space work [4 dc cluster, ch 2].
Work [4 dc cluster, ch 2] in each ch-1 space around (16 clusters).
Sl st into the ch-2 space between the first two clusters.
Do not fasten off.
Round 4
Ch 2, into the same space work [5 dc cluster, ch 3].
Work [5 dc cluster, ch 3] into each ch-2 space around (16 clusters).
Sl st into the ch-3 space between the first two clusters.
Fasten off.
Round 5
Join Color B into any ch-3 space, ch 3.
Work [2 tr, ch 2, 3 tr] into the same space (first corner).
3 dc in next ch-3 space, 3 hdc in next ch-3 space, 3 dc in next ch-3 space, [3 tr, ch 2, 3 tr] in next ch-3 space.
Repeat from * to * two more times.
Finish with 3 dc, 3 hdc, 3 dc into the last sets of spaces.
Join with sl st into the top of the first tr (not the ch-3). Fasten off.
Assembling the Blanket
Lay out your 63 squares with the right side facing up. Arrange colors in a balanced way (e.g., alternating warm and cool tones) so no two motifs of the same shade are right next to each other.
Choose your preferred joining method. The continuous join-as-you-go technique works beautifully and creates a seamless finish. Using Color B, start in the top right corner and join the first row of squares together, then continue row by row.
Follow a video or step-by-step tutorial for your chosen joining method to connect all motifs into a complete blanket.
Once you return to the starting corner (top right), do not fasten off—you’re ready to begin the border.
Border (Round 1)
After joining, continue with your chosen border design to frame the blanket. A simple round of double crochets or a decorative shell edging both look beautiful with this design.
Tips for Success
Use a mix of contrasting colors to really make the sunbursts pop.
Block your squares before joining for a polished, even look.
Consider making extra squares to create matching pillows, tote bags, or table runners.
The Large Sunburst Granny Square is a stunning twist on the traditional granny square, bringing vibrant bursts of color and texture to your crochet projects. By combining simple stitches in clever ways, you’ll create a blanket that looks intricate yet is achievable even for intermediate crocheters. Whether you keep it for yourself or gift it to someone special, this project is sure to become a cherished handmade treasure.
✨ Ready to get started? Grab your yarn and hook, and watch your sunburst blanket shine as each square comes together!
You might also be interested
You Are Here: