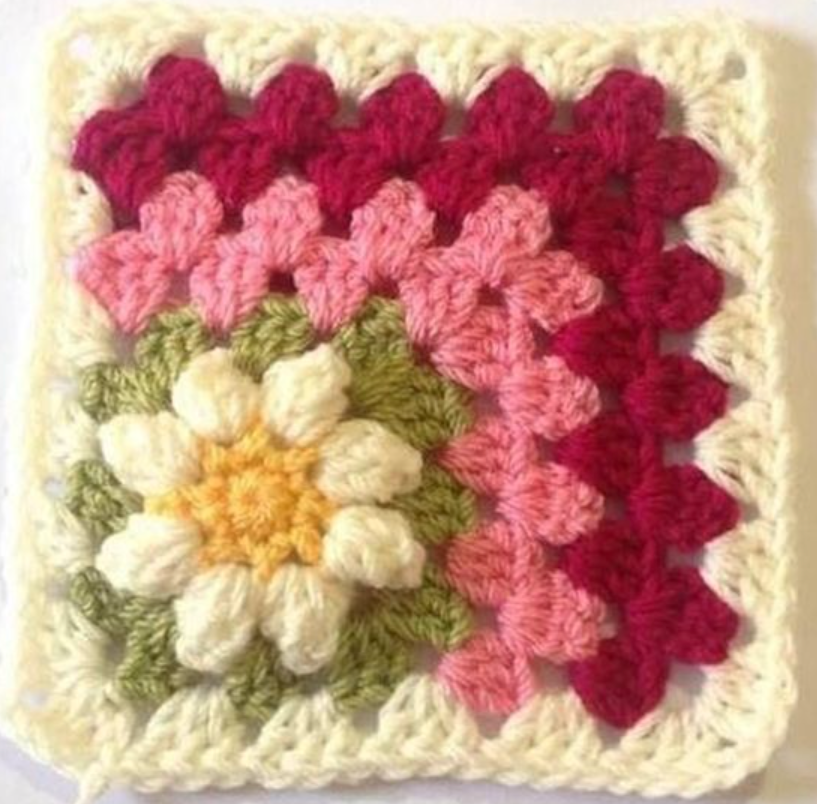
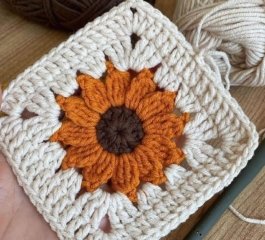
Crochet enthusiasts are always looking for patterns that combine both beauty and functionality, and the Mitered Flower Square is the perfect blend of both. This delightful crochet square features a charming flower at its center, surrounded by layers of vibrant colors that gradually expand outward in a mitered, granny square style. Its versatility makes it ideal for a wide range of projects, from cozy afghans and stylish cushion covers to eye-catching bags and wall hangings.
Mitered Flower Square Crochet Free Pattern
Written byadmin in
The pattern is a great opportunity to experiment with different color combinations. You can create soft, pastel versions for a calming effect or go bold with bright shades to make your project pop. Whatever your style, the Mitered Flower Square is a must-try pattern for your crochet repertoire.
If you’re looking for a beautiful, versatile pattern to use in a variety of crochet projects, the Mitered Flower Square is a fantastic choice. This square blends the beauty of a delicate floral motif with the geometric appeal of the mitered granny square, perfect for afghans, pillows, or even bags. Let’s dive into the details and learn how to create this lovely square step by step.

Mitered Flower Square Crochet Free Pattern
Materials:
Yarn: Use four colors of your choice. In the example, yellow is used for the flower center, white for the petals, green for the first few rounds, and pink shades for the outer square. You can experiment with your own color combinations.
Hook: Size H (5.0 mm) or any hook size suitable for your yarn.
Scissors: To trim the ends.
Yarn needle: For weaving in ends.
Mitered Flower Square Crochet Free Pattern
Abbreviations:
- ch = chain
- sl st = slip stitch
- sc = single crochet
- dc = double crochet
- st(s) = stitch(es)
- sp = space
- ch-sp = chain space
- beg = beginning
- rep = repeat
Pattern Instructions:
Round 1: Creating the Flower Center
Start with a magic ring or ch 4 and join with a sl st to form a ring.
Ch 3 (counts as 1 dc), work 15 dc into the ring. Join with a sl st to the top of the beg ch-3. (16 dc total) Fasten off the yellow yarn.
Round 2: Forming the Petals
Attach the white yarn into any dc stitch.
Ch 2 (counts as part of the puff stitch), work a puff stitch in the same st (yarn over, insert hook, pull up a loop, repeat 2 more times, then yarn over and pull through all loops on the hook). Ch 2.
Skip 1 dc, puff stitch in the next st, ch 2. Rep this around for a total of 8 puff stitches.
Join with a sl st to the top of the first puff stitch and fasten off the white yarn.
Round 3: Adding the Green Border
Attach the green yarn in any ch-2 sp between puff stitches.
Ch 3 (counts as 1 dc), work 2 dc in the same sp, ch 1.
In the next ch-2 sp, work 3 dc, ch 1. Rep around for a total of 8 groups of 3 dc.
Join with a sl st to the top of the beg ch-3.
Round 4: Start the Granny Square (Still in Green)
Sl st into the next ch-1 sp, ch 3 (counts as 1 dc), 2 dc into the same sp.
In the next ch-1 sp, work 3 dc, ch 2, 3 dc (this forms a corner).
In the next ch-1 sp, work 3 dc.
Repeat the pattern of 3 dc, ch 2, 3 dc in corners, and 3 dc in ch-1 spaces until the round is complete.
Join with a sl st to the beg ch-3.
Round 5: Transition to Pink Shades
Attach the light pink yarn in any corner ch-2 sp.
Ch 3 (counts as 1 dc), 2 dc in the same corner sp, ch 2, 3 dc into the same corner.
Work 3 dc in each sp between the previous round’s groups of 3 dc.
Continue around the square, making sure to work 3 dc, ch 2, 3 dc in each corner.
Join with a sl st to the beg ch-3.
Round 6: Expanding with Darker Pink
Attach the darker pink yarn in any corner ch-2 sp.
Ch 3, 2 dc in the same sp, ch 2, 3 dc in the same sp.
Work 3 dc in each sp between groups of the previous round, and in the corners, work 3 dc, ch 2, 3 dc.
Repeat the pattern around and join with a sl st.
Final Round 7: Finishing with a Neutral Color (Optional)
Attach a neutral color, like cream or white, in any corner ch-2 sp.
Ch 3, 2 dc in the same sp, ch 2, 3 dc in the same sp.
Work 3 dc in each sp between groups of the previous round.
In each corner, work 3 dc, ch 2, 3 dc.
Finish the round and join with a sl st to the beg ch-3.
Finishing Touches:
Fasten off and weave in all loose ends with a yarn needle.
Block your square to give it a neat and professional look.
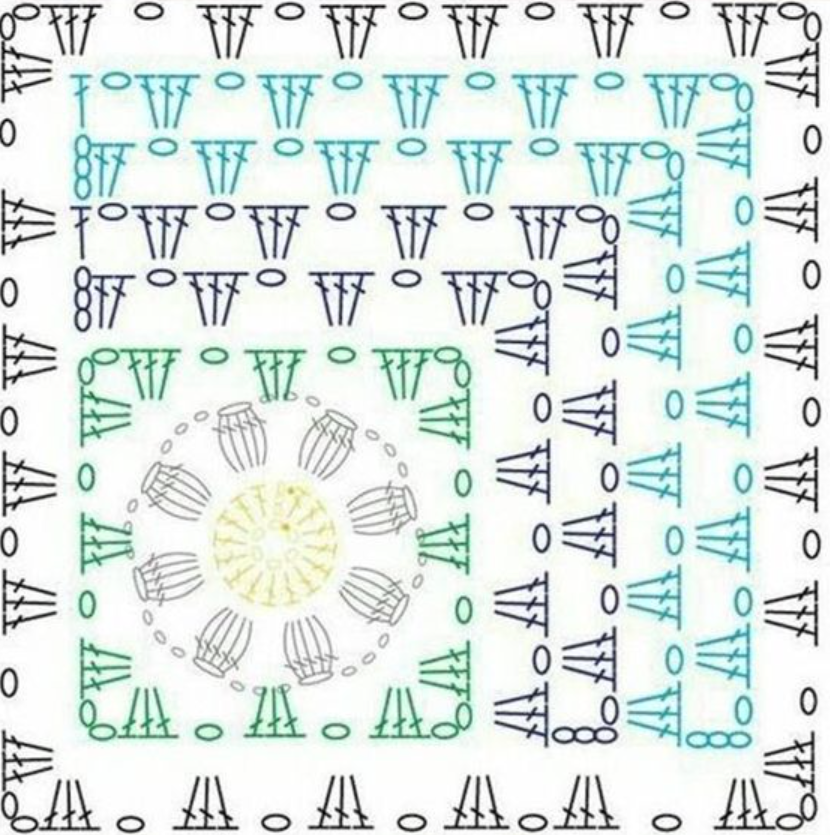
Diagram
Tips for Using the Mitered Flower Square:
- Afghans: Use this square as a building block to create a stunning blanket. Join multiple squares with a slip stitch or whip stitch for a seamless look.
- Pillows: Make a set of squares and stitch them together to form a colorful, textured cushion cover.
- Bags: Create a boho-style bag by joining two squares together and adding straps.
This Mitered Flower Square pattern is perfect for experimenting with color. Try alternating shades of yarn to create vibrant or subtle squares, depending on your preference. With this pattern, you’ll have a versatile piece that can be adapted into countless crochet projects.
Happy Crocheting!
You might also be interested
You Are Here: