Welcome back, dear readers of the My Crafts Inpirations blog! I am delighted to have you here once again to explore another delightful project in the realm of crochet. Crocheting is a truly remarkable craft that has woven its way into various aspects of our daily lives, offering not only practicality but also serving as a therapeutic outlet, allowing us to find solace within ourselves.
Mitered Square Blanket Free Crochet Pattern
Written byadmin in
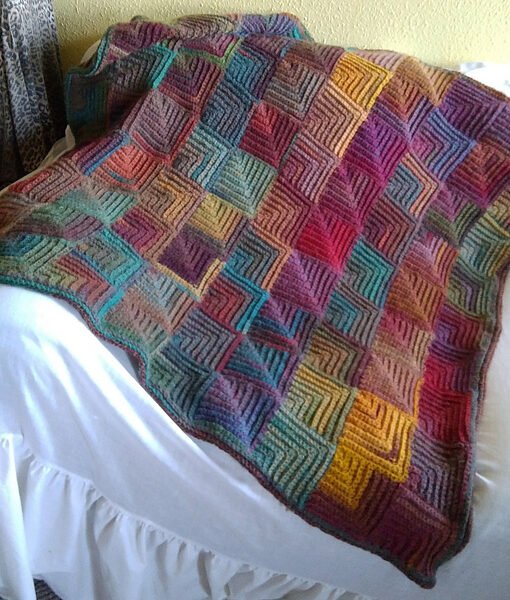
Enter the enchanting world of the Mitered Square Blanket, a crochet project that is bound to captivate anyone who lays eyes on it. Whether you choose to create this masterpiece for your personal enjoyment or to present it as a heartfelt gift to a loved one, the Mitered Square Blanket is a splendid choice. Moreover, it provides an excellent opportunity to hone your crochet skills, making it an ideal option for those eager to explore new stitches and techniques.
What makes the Mitered Square Blanket truly remarkable is its versatility in terms of color combinations. As a beginner crocheter, you might find yourself intrigued by this pattern, perhaps wondering how to embark on your own creative journey. Fear not! I’ve compiled some valuable tips that will not only guide you but also serve as a helpful starting point for your new project. Let’s dive in and let your crochet adventure begin!


Materials:
Worsted weight yarn in your chosen colors
Crochet hook suitable for the yarn weight
Scissors
Tapestry needle
Stitches and Abbreviations:
ch: chain
sc: single crochet
sc3tog: single crochet three together (decrease)
st(s): stitch(es)
Important Notes:
- Work in the back loops only throughout the entire pattern.
- Work continuously without fastening off between squares and rows.
- Easily adaptable to your desired size.
- Each square measures approximately 4.75 inches.
Instructions:
- Chain 34 stitches.
- Row 1: Starting from the second chain from the hook, single crochet in each of the next 14 chains. Single crochet three together (sc3tog), then single crochet in each of the remaining 15 chains. Turn — 31 stitches.
- Row 2: Chain 1 (this chain does not count as a stitch here and throughout), single crochet in each of the next 14 stitches. Sc3tog, then single crochet in each of the last 14 stitches. Turn — 29 stitches.
- Row 3: Chain 1, single crochet in each of the next 13 stitches. Sc3tog, then single crochet in each of the last 13 stitches. Turn — 27 stitches.
- Row 4: Chain 1, single crochet in each of the next 12 stitches. Sc3tog, then single crochet in each of the last 12 stitches. Turn — 25 stitches.
- Row 5: Chain 1, single crochet in each of the next 11 stitches. Sc3tog, then single crochet in each of the last 11 stitches. Turn — 23 stitches.
- Row 6: Chain 1, single crochet in each of the next 10 stitches. Sc3tog, then single crochet in each of the last 10 stitches. Turn — 21 stitches.
- Row 7: Chain 1, single crochet in each of the next 9 stitches. Sc3tog, then single crochet in each of the last 9 stitches. Turn — 19 stitches.
- Row 8: Chain 1, single crochet in each of the next 8 stitches. Sc3tog, then single crochet in each of the last 8 stitches. Turn — 17 stitches.
- Row 9: Chain 1, single crochet in each of the next 7 stitches. Sc3tog, then single crochet in each of the last 7 stitches. Turn — 15 stitches.
- Row 10: Chain 1, single crochet in each of the next 6 stitches. Sc3tog, then single crochet in each of the last 6 stitches. Turn — 13 stitches.
- Row 11: Chain 1, single crochet in each of the next 5 stitches. Sc3tog, then single crochet in each of the last 5 stitches. Turn — 11 stitches.
- Row 12: Chain 1, single crochet in each of the next 4 stitches. Sc3tog, then single crochet in each of the last 4 stitches. Turn — 9 stitches.
- Row 13: Chain 1, single crochet in each of the next 3 stitches. Sc3tog, then single crochet in each of the last 3 stitches. Turn — 7 stitches.
- Row 14: Chain 1, single crochet in each of the next 2 stitches. Sc3tog, then single crochet in each of the last 2 stitches. Turn — 5 stitches.
- Row 15: Chain 1, single crochet in the next stitch. Sc3tog, then single crochet in the last stitch. Turn — 3 stitches.
- Row 16: Chain 1, sc3tog, do not turn — 1 stitch.
Proceeding with Each Square: Upon completing Row 16 of the initial square, adhere to the “Setup Row” guidelines for the subsequent square (as specified in the pattern).

Mitered Square diagram
Repeat Rows 1 to 16 for this new square. Continue crafting additional squares by following the “Setup Row” and Rows 1 to 16 for each square until you achieve the preferred width of your blanket. Remember to turn your work after completing each row.

Mitered Square diagram
Final Touch: Once you have crocheted the desired quantity of squares, securely fasten off the yarn and neatly weave in any loose ends using a tapestry needle. Congratulations! Your mitered square blanket is now finished and ready to be used or given as a thoughtful gift!
Mitered Square Blanket
Video Tutorial
For those who prefer to learn through videos, I have an excellent suggestion. I recommend this comprehensive tutorial, especially created for visual learners who enjoy video content more than following written instructions. The video was made by Ina Knits’ channel. You can find the video tutorial here.
the tutorial made by petalstopicots.com.
The My Crafts Inspirations team would like to thank each reader for following us this far, we wish you much success with this wonderful pattern and we hope to help you with our next crochet suggestion. To the next!
You might also be interested
You Are Here: