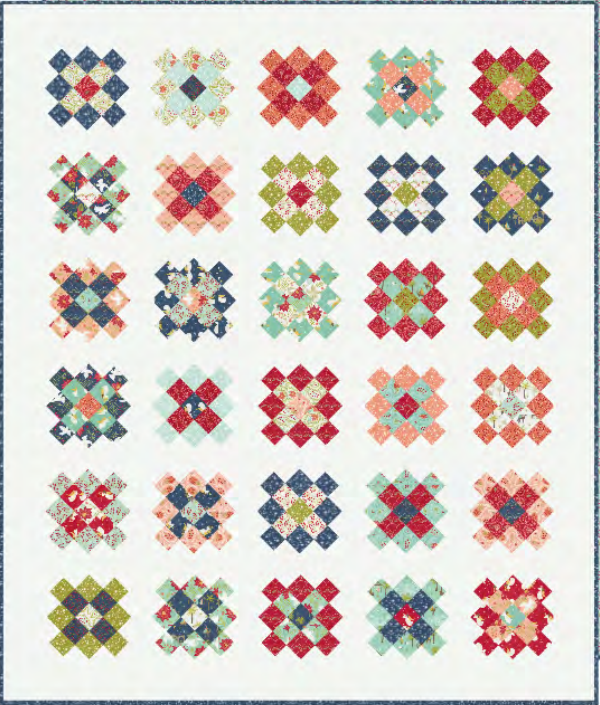
Quilting is not just about stitching fabric together; it’s about telling stories, expressing creativity, and embracing the beauty of imperfection. One of the most beloved and versatile quilting techniques is the Granny Square. Originating from the granny square crochet tradition, this classic motif has found its way into quilting, capturing the hearts of quilters with its charm and adaptability. Today, we delve into the world of Scrappy Granny Squares—a celebration of color, texture, and endless possibilities.
Scrappy Granny Squares
Written byadmin in
Embracing Scrappiness: The beauty of Scrappy Granny Squares lies in their eclectic nature. Unlike traditional quilting blocks with uniform fabrics, Scrappy Granny Squares invite a riot of colors and patterns. They embrace the randomness of a scrap stash, turning leftover fabric into small masterpieces. From vibrant florals to calming pastels, every scrap finds its place in these squares, creating a visual feast for the eyes.
Materials
Prints: A partial jelly roll or assorted 2.5in squares
Background fabric: 3.5 yards
Backing fabric: 4 yards
Binding fabric: 1/2 yard (x7- 2.5in x WOF strips)
Scrappy Granny Squares
Cutting
Prints: Cut your jelly roll or 2.5” squares as you go
Background:
Cut x6 4.5in x WOF strips. Set aside for borders.
Cut x36 2.5in x WOF strips. Set aside x12 strips for sashing.
Subcut remaining x24 strips into x360-2.5in x 2.75in pieces. (Start cutting on the selvedge side and unfold for the last cut in each strip.)
Quilt block assembly
Each block requires:
• x12 2.5in x 2.75in background squares
• 13 assorted 2.5in print squares: (x1 Center color – x4 middle color – x8 outer color)
1. Layout each block as shown choosing a different
colorway for each ring of the granny square block. Fig. 1
2. Sew rows together using a 1/4in seam allowance. Press seams in each row in opposite directions to nest. Fig. 2
3. Sew rows together lining up your seams.
4. Sew the top and bottom square on by pinning in the center. Press seams away from center. Fig. 3
5. Press block flat. Fig. 4 Make 30 blocks
Figure 1 & Figure 2:
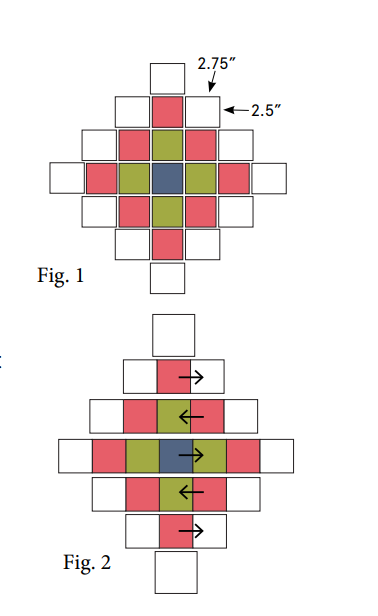
Fig1/ Fig 2
Figure 3 & Figure 4:
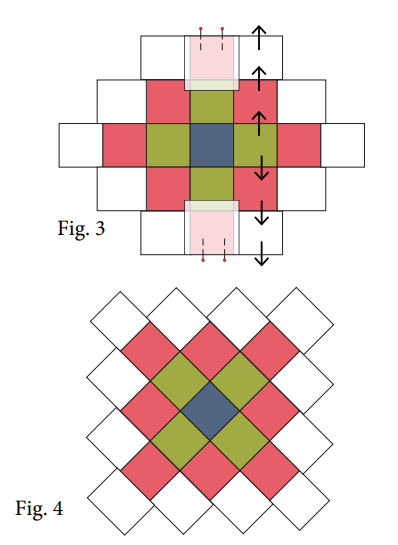
Fig 3/ fig 4
Trimming the Blocks
Trim block square leaving 1/4in – 3/8in from each point. Make a few blocks before trimming to see what size your blocks need to be trimmed
to. They should measure around 8-3/4 – 8-7/8in square. Fig. 5
1. Start by trimming one side straight leaving a minimum of 1/4 inch seam allowance between your point and the edge of the block.
2. Rotate block and repeat for the next side. Use your ruler and line up the ruler square on the cut edge so your block will be square.
3. Rotate the block again and use the two cut sides to measure and trim the two remaining sides. Trim each block to the exact same size.
TIP: Mark the first few blocks with a disappearing ink or hera marker before cutting. So instead of cutting, mark the cut lines to see how your blocks are measuring and squaring up.

Fig 5
Cut + Assemble the Sashing
From the 12 strips of sashing that were set aside:
1. From x6 sashing strips cut x24 – 2.5in x the size of your block.
Example: If your blocks were cut to 8.75in then cut x24 2.5in x 8.75in sashing pieces.
2. Sew the remaining 6 sashing strips together end to end to make one long strip. Set aside until quilt top assembly.
3. Sew the 4.5in border strips together end to end to make one long strip. Set aside until quilt top assembly.
Quilt top assembly
1. Layout blocks as desired adding a sashing piece between blocks.
2. Sew rows together. Press seams towards sashing.
3. Measure each row and cut sashing to match. Sew sashing between each row. Press towards sashing.
4. Measure the width of the quilt in three places and cut both borders the average of the three measurements. Cut both borders the exact same size. Add to top and bottom. Press towards borders.
5. Repeat for side borders. Add borders by finding your center point on each border strip. Match up center point of quilt with center point of border. Pin generously!

Quilt top assembly
Finish your quilt!
• Piece together backing fabric and press seams.
• Make a quilt sandwich by layering backing wrong side up, batting and quilt top right side up.
• Baste and quilt as desired.
You might also be interested
You Are Here: