Hello dear crochet friends, how are you? Well, I hope you’re all well like me. Today on our beloved blog My Crafts Inspirations we are going to talk about a wonderful crochet pattern, Spring Bubbles Mandala and I hope it will be to everyone’s liking.
Spring Bubbles Mandala Crochet Pattern
Written byadmin in
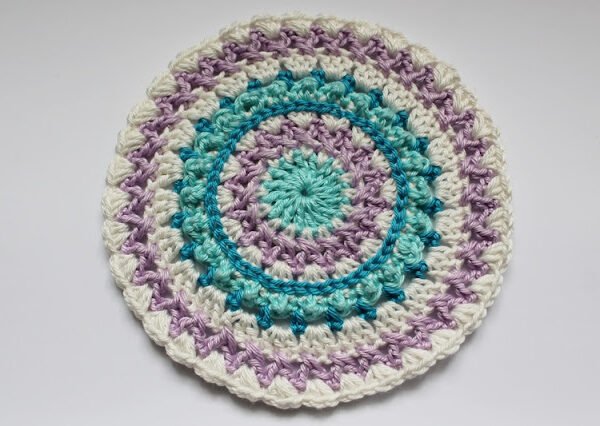
Crocheting is not just a craft; it’s a form of artistic expression that allows you to weave together colors, textures, and patterns to create beautiful and intricate designs. If you’re looking for a project that combines creativity and relaxation, the Spring Bubbles Mandala crochet pattern is the perfect choice.
This delightful pattern captures the essence of spring with its vibrant colors and whimsical design, making it a joy to crochet and a stunning addition to any home decor. The Spring Bubbles Mandala crochet pattern is not just a project; it’s an exploration of color, texture, and creativity. As you immerse yourself in the rhythmic flow of stitches, you’ll witness a beautiful mandala emerge, capturing the essence of spring and showcasing your crochet skills.

Materials Needed:
Before diving into the details of the pattern, gather the materials you’ll need for this project. The Spring Bubbles Mandala crochet pattern typically requires:
Worsted weight yarn in various spring-inspired colors.
Crochet hook appropriate for the yarn weight (usually around a G or H hook).
Yarn needle for weaving in ends.
Scissors to trim yarn.
Optional: a hoop or frame for displaying the finished mandala.
Pattern Notes and Special Stitches:
This pattern is presented in US crochet terms. Commencing with a magic ring, the following stitches will be used: chain stitch (ch), slip stitch (slst), single crochet (sc), double crochet (dc), treble crochet (tr), and a few special stitches:
- Crossed Double Crochet (crossed dc): Yarn over (yo) and, working over the last dc made, insert the hook into the stitch before the recently created dc. Complete the dc as usual. (When combined with a dc and ch-1, the crossed dc forms a type of “crossed V-stitch.”)
- Surface Stitches: With a loop on your hook and the yarn behind your work, insert the hook between the next two dc’s, yo, pull the loop through the gap and through the loop on your hook. Essentially, this involves working slip stitches around the body of the dc.
- Double Single Crochet (dsc): Insert your hook into the specified stitch or space, yo, pull through the space (2 loops on the hook), yo, insert the hook into the same space again, yo, pull through the space (4 loops on the hook), yo, pull through all 4 loops on your hook.
Pattern:

Round 2: Attach another color with a slip stitch to any chain-1 space, chain 1, single crochet in the same space, chain 1, single crochet in the next gap, chain 1, repeat from * around, and join with a slip stitch to the first single crochet, then fasten off. (16 single crochets, 16 chain-1 gaps)

Round 2
Round 3: Attach another color with a slip stitch to any chain-1 space, chain 4 (counts as double crochet and chain-1), crossed double crochet into the chain-1 gap before the gap where you started, double crochet into the next free gap, chain-1, crossed double crochet into the (already “taken”) gap before the stitch you’ve just done, repeat from * around, and join with a slip stitch to the third chain of your beginning chains, and fasten off. (16 crossed V-Stitches, 16 chain-1 gaps) Refer to the “Special Stitches” section for details on the crossed double crochet. For the last double crochet/crossed double crochet repetition, place the double crochet into the space where you’ve already placed your first crossed double crochet at the beginning of the round – so actually, this is not a “free” gap. Tighten the magic ring if you haven’t already.

Round 3
Easy Alternative: Simply work regular V-Stitches (i.e., double crochet, chain-1, double crochet) in every chain-1 gap around.
Round 4: Attach another color with a slip stitch to any chain-1 space, chain 3 (counts as double crochet) and 2 more double crochets into the same space, 3 double crochets into the next space, repeat from * around, and join with a slip stitch to the beginning chain-3, then fasten off. (48 double crochets, no spaces)

Round 4
Round 5: Holding the yarn at the back of your work, insert the hook between any two double crochets of the previous round, yarn over, pull the loop through the gap, and work surface stitches around. To finish the round, work the last surface stitch in the gap where you started, cut the thread, finish off, and use your hook or a needle to pull the loose end through to the back again, tie the two ends together, and weave them in.
Round 5
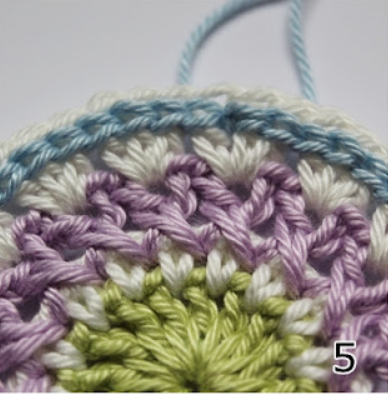
Round 6: Turn your work so that the left side is facing you. Attach another color with a slip stitch to any double crochet of round 4. Chain 1, single crochet in the same stitch, treble crochet in the next stitch, single crochet in the next stitch, treble crochet in the next stitch, repeat from * around, and join with a slip stitch to the first single crochet, then fasten off and turn again.
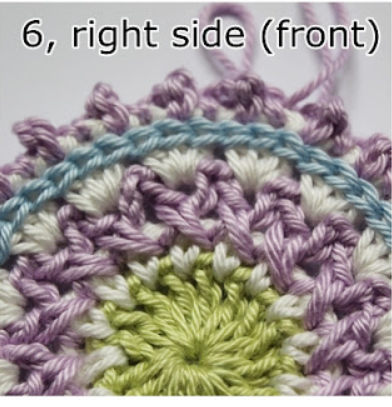
Round 6
Round 7: With the right side facing you again, attach another color with a slip stitch to any single crochet of the previous round (those are the smaller, tighter stitches of the two). Chain 1, single crochet in the same stitch, chain 3, skip the treble crochet, single crochet in the next single crochet, chain 3, skip the treble crochet, repeat from * around, and join with a slip stitch to the first single crochet, then fasten off. (24 single crochets, 24 chain-3 gaps)

Round 7
Round 8: Attach another color with a slip stitch to any chain-3 space, chain 3 (counts as double crochet) and 2 more double crochets into the same space, 3 double crochets into the next space, repeat from * around, and join with a slip stitch to the beginning chain-3, then fasten off. (72 double crochets, no spaces)
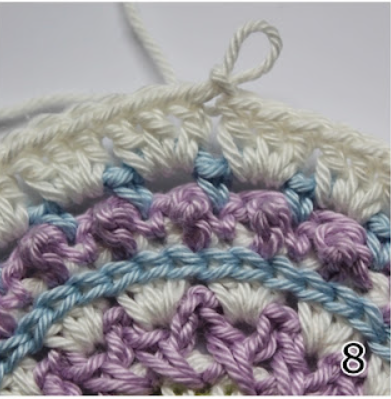
Round 8
Round 9: Attach another color with a slip stitch to any double crochet, chain 4 (counts as double crochet and chain-1), crossed double crochet into the double crochet before the stitch where you started, skip the next free double crochet, double crochet into the next double crochet, chain-1, crossed double crochet into the skipped double crochet before the stitch you’ve just done, repeat from * around, and join with a slip stitch to the third chain of your beginning chains, then fasten off.
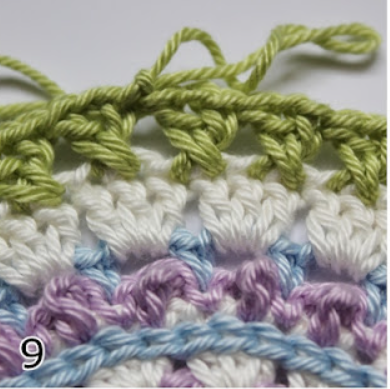
Round 9
Round 10: Attach another color with a slip stitch to any chain-1 gap of the previous round, chain 1, 2 double single crochets (dsc) in the same gap, chain 1, 2 double single crochets in the next gap, chain 1, repeat from * around, and join with a slip stitch to the first double single crochet, then fasten off and weave in all the ends.
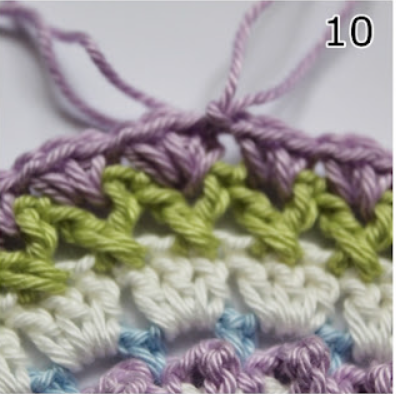
Round 10
Once your Spring Bubbles Mandala is complete and blocked, decide how you want to display it. Some crafters choose to frame their mandalas in embroidery hoops or shadow boxes, while others use them as decorative centerpieces for tables or wall hangings.
To access the PDF of the pattern and start your next crochet project, access the PDF below and let the needle magic begin!
Access the PDF/ Spring Bubbles Mandala Crochet Pattern
The My Crafts Inspirations team extends heartfelt gratitude to every reader who has accompanied us on this creative journey. We wish you tremendous success in crafting this delightful pattern, and we look forward to assisting you with our upcoming crochet recommendations. Until next time, happy crafting!
You might also be interested
You Are Here: