Quilting has long been cherished as a timeless craft, weaving together artistry and functionality. Among the myriad quilt blocks available to enthusiasts, the Pinwheel Star Quilt Block stands out as a charming and versatile choice. In this article, we’ll delve into the art of crafting this delightful block, exploring its history, design possibilities, and offering step-by-step instructions to guide you through the process.
The Pinwheel Star Quilt Block
Written byadmin in
The Pinwheel Star Quilt Block is a classic design that has graced quilts for generations. Its roots can be traced back to traditional quilting patterns that were often passed down through families and communities. The pinwheel motif, with its dynamic and swirling appearance, adds a touch of whimsy to quilt designs, making it a perennial favorite among quilters.
One of the alluring aspects of the Pinwheel Star Quilt Block is its adaptability. From bold and vibrant color schemes to more subdued and elegant choices, this block can be tailored to suit any aesthetic. Consider experimenting with different fabric patterns, tones, and textures to create a quilt that reflects your unique style.
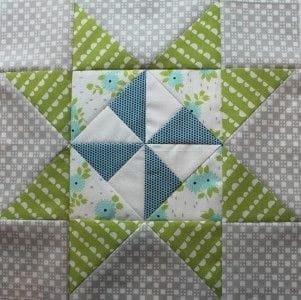
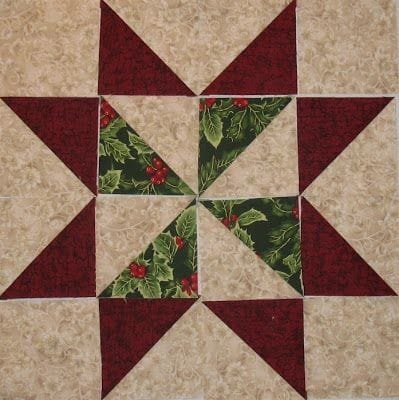

For a modern twist, try incorporating a mix of solids and prints or playing with gradient color schemes. The Pinwheel Star Quilt Block’s versatility ensures that it can seamlessly blend into various quilting projects, from baby blankets to larger bed quilts.
- 1 – 7-1/4″ square (cut diagonally twice in an X for 4 large triangles)
- 1 – 4-1/4″ square (cut diagonally twice in an X for 4 small triangles)
- 2 – 3-7/8″ squares (cut each in half diagonally for 4 medium triangles)
- 4 – 3-1/2″ squares
From Color 2:
1 – 4-1/4″ square (cut diagonally twice in an X for 4 small triangles)
From Color 3:
- 4 – 3-7/8″ squares (cut each in half diagonally for 8 medium triangles)
Assembly Steps:
Sew together one color 2 small triangle and one color 1 small triangle along short sides (Diagram 1). Then join the long side of a color 1 medium triangle to the color 2-and-color 1 triangle set. Repeat to make a total of four units.

Diagram 1
Sew together the Step 1 units in pairs. Press the seam allowances in opposite directions. Then join the pairs to make the center unit.
Sew the long side of a color 3 medium triangle to one short side of a color 1 large triangle (Diagram 2). Repeat with a second color 3 medium triangle on the other short side of the color 1 large triangle to make a Flying Geese unit. Press all seam allowances toward the color 3 triangles. The Flying Geese unit should measure 3-1/2 ×6-1/2″, including the seam allowances. Repeat to make a total of four Flying Geese units.

Diagram 2
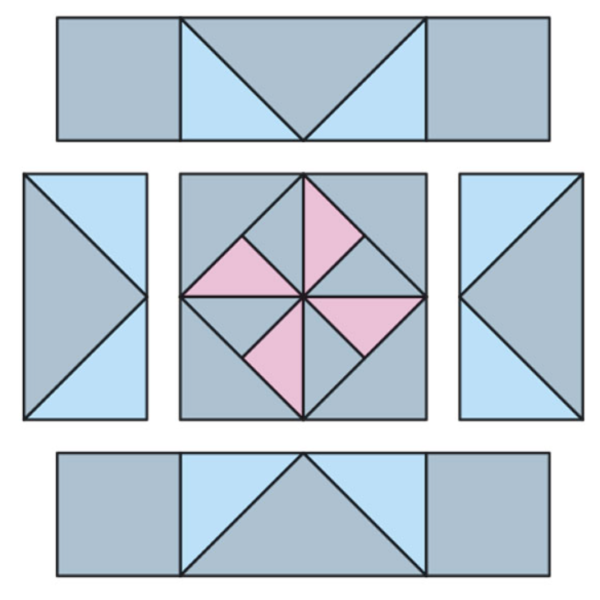
Lay out the pieces for one block in horizontal rows (Diagram 3). Sew together the pieces in each row. Press the seam allowances toward the color 1, 3-1/2″ squares, or the center unit. Then join the rows to make a block (Block Assembly Diagram). Press the seam allowances in one direction.
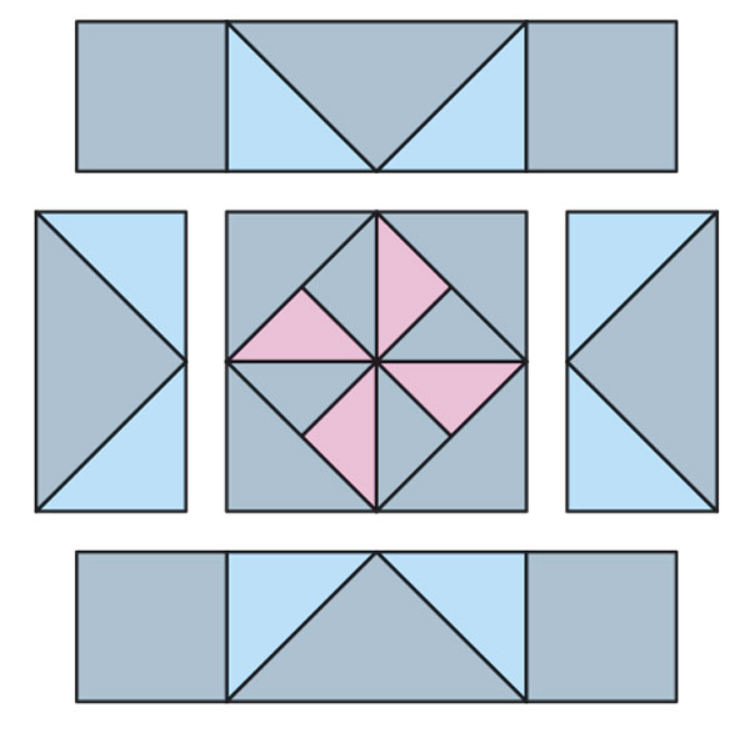
Diagram 3
By following these step-by-step instructions, you’ll bring to life a stunning Pinwheel Star Quilt Block, showcasing the dynamic interplay of solid colors and geometric shapes. Experiment with different color combinations to make this classic block uniquely yours. Happy quilting!
You might also be interested
You Are Here: