A handmade crochet footmuff is a lovely way to add warmth and texture to a baby travel setup during cooler weather. This design uses waffle stitch, which creates a thick, softly textured fabric, and includes carefully positioned openings for the harness straps.
Crochet Maxi-Cosi Footmuff Pattern: Cozy Waffle Stitch Cover
Written byadmin in
The project is worked as a long piece that forms the front and back panels. It may be finished with a fabric lining and two separating zippers, or with buttons and crocheted button loops. The upper corners of the back panel fold inward to form a small hood.
This article is an English adaptation of the measurements and notes in the original Dutch diagram. It is an independent craft tutorial and is not an official Maxi-Cosi pattern.
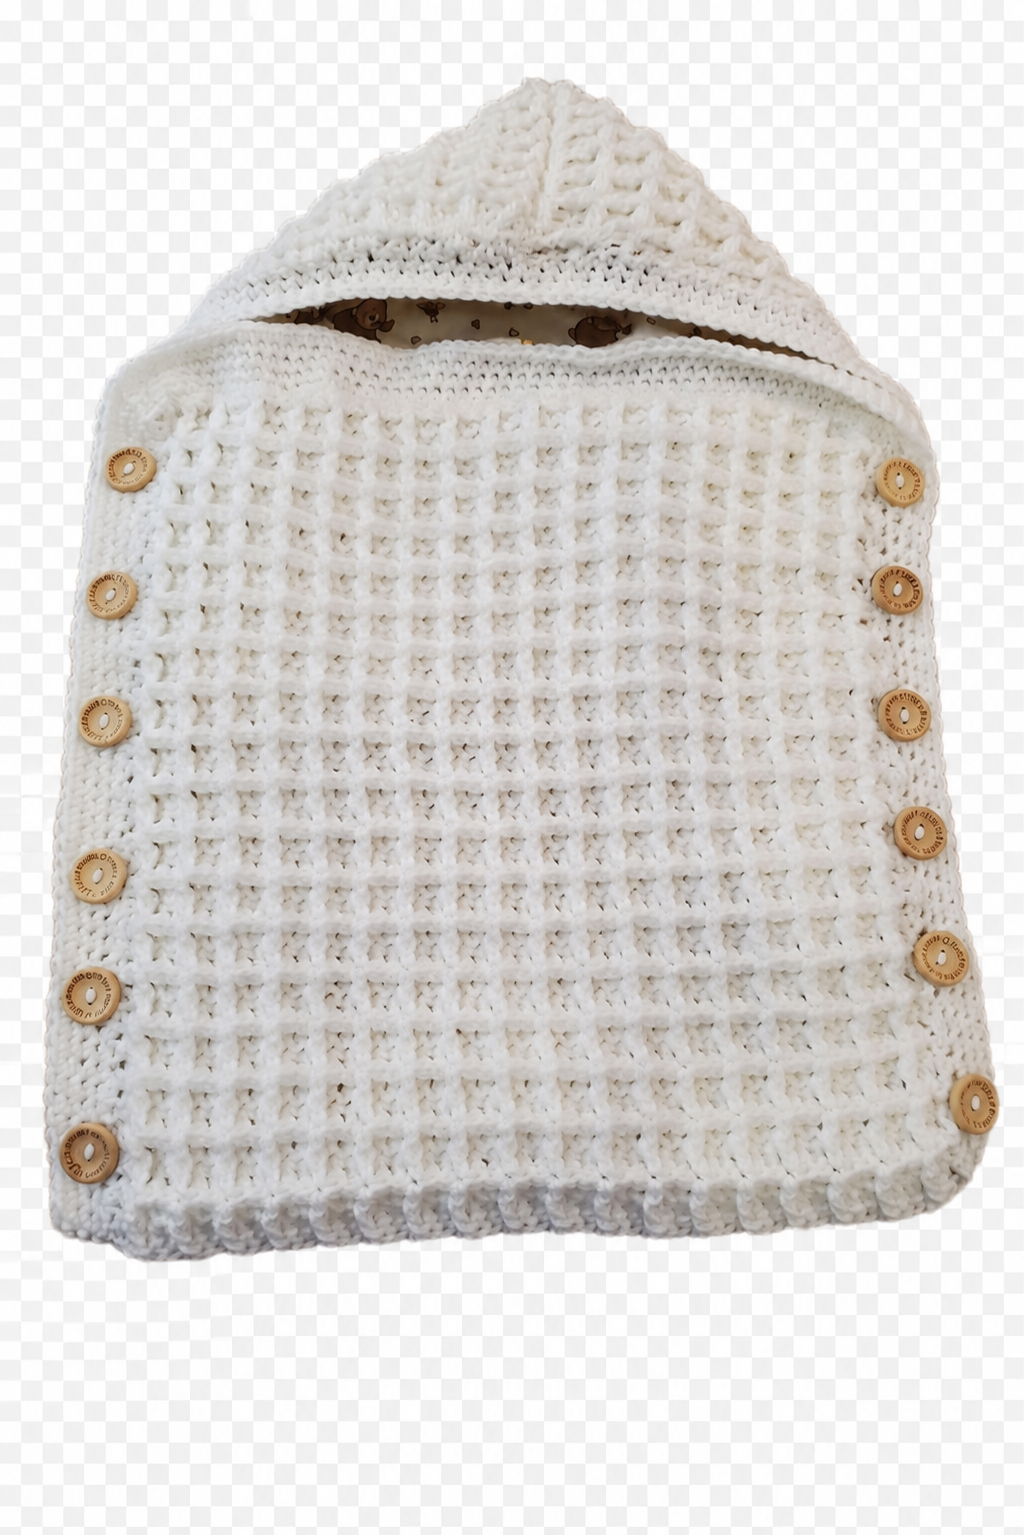
Crochet Maxi-Cosi Footmuff Pattern
Project Details
- Skill level: Intermediate
- Main stitch: Waffle stitch
- Finished width: Approximately 45 cm (17.7 in)
- Front panel height: 45 cm (17.7 in)
- Front flap height: 10 cm (3.9 in)
- Back panel height: 95 cm (37.4 in)
- Foundation: 97 chains
- Stitch count: Approximately 96 stitches
- Construction: One long crocheted panel with optional fabric lining
Materials
- 11 balls of Schachenmayr Catania cotton yarn
- One additional ball if the upper flap will be crocheted instead of made from lining fabric
- 3.5 mm (US E/4) crochet hook
- Yarn needle
- Scissors
- Stitch markers
- Measuring tape
Optional Finishing Materials
- 1.55 m (approximately 1.7 yd) of lining fabric
- Two 55 cm (approximately 21.7 in) separating zippers
- Buttons, if you prefer a buttoned closure
- Sewing needle or sewing machine
- Matching sewing thread
- Pins or fabric clips
Note: The original material list reads “0.55 cm” for the zippers. This appears to be a typographical error; the intended measurement is most likely 0.55 m, or 55 cm.
US Crochet Abbreviations
- ch: chain
- sc: single crochet
- dc: double crochet
- FPdc: front post double crochet
- st(s): stitch(es)
- rep: repeat
Gauge and Fit
The original diagram gives an approximate width of 45 cm for 96 stitches. Because yarn tension and waffle-stitch methods can vary, make a swatch before beginning. Adjust the hook size if necessary so that the panel reaches the correct width without becoming stiff.
The strap openings should be positioned from actual measurements rather than stitch counts. Measure your fabric as you work and mark the opening locations carefully.
Waffle Stitch Note
The source diagram instructs the maker to continue in waffle stitch but does not provide its row-by-row repeat. Use your preferred waffle-stitch method over the 96-stitch width, keeping the edges straight and the stitch count consistent.
If you use a different waffle-stitch tutorial, confirm that its stitch multiple works with 96 stitches before beginning the main panel.
Crochet Instructions
1. Make the Foundation
Chain 97.
Work 1 sc in the second ch from the hook and 1 sc in each remaining ch across. You should have 96 sc.
Turn your work and begin working in waffle stitch.
2. Decide How to Make the Upper Front Flap
The finished flap measures 10 cm (3.9 in) high.
You may make it in one of two ways:
- Crocheted flap: Begin with a 10 cm section in waffle stitch, place a marker across the fold line, and then continue into the front panel. The original notes recommend buying one extra ball of yarn for this option.
- Fabric flap: Begin directly with the main front panel and add the 10 cm fabric flap when attaching the lining.
3. Crochet the Front Panel
Continue evenly in waffle stitch until the main front panel measures 45 cm (17.7 in) from the flap fold line—or from the foundation edge if the flap will be made from fabric.
Keep checking that the width remains close to 45 cm. Do not fasten off, because the back panel continues from the front panel as one long piece.
4. Continue with the Back Panel
Continue the same piece in waffle stitch to form the back panel. Place a marker where the back section begins. From that marker, the back panel should measure approximately 95 cm (37.4 in) to its upper edge.
Follow the English measurement chart when forming the harness openings.
Harness Opening Placement
Crotch-Strap Opening
- Measure 30 cm (11.8 in) upward from the lower edge of the back panel.
- Center an opening measuring 7 cm (2.8 in) wide.
- Leave approximately 19 cm (7.5 in) between the opening and each side edge.
Shoulder-Strap Openings
Create two horizontal rows of shoulder-strap openings:
- Each opening is 5 cm (2 in) wide.
- Leave approximately 14.2 cm (5.6 in) from each side edge to the nearest opening.
- Leave a 6.5 cm (2.6 in) center space between the two openings in each row.
- Leave approximately 4 cm (1.6 in) between the two rows.
- The diagram indicates an opening height of approximately 1 cm (0.4 in).
- The distance from the crotch opening to the beginning of the shoulder openings is 35 cm (13.8 in).
- The distance from the crotch opening to the upper shoulder-opening row is 40 cm (15.7 in).
- From the upper shoulder-opening row to the top of the back panel, measure approximately 25 cm (9.8 in).
How to Form an Opening
Work in pattern to the marked opening. Chain across the required width, skip the corresponding section of stitches, and resume the waffle-stitch pattern after the opening. On the following row, work over the chains while keeping the opening clear.
Because individual gauge varies, determine the number of chains from your own stitches per centimeter rather than relying on a fixed stitch count.
Forming the Hood
At the top of the back panel, fold the two upper corners inward along the diagonal lines shown on the chart. Join or sew the folded edges securely to create the hood shape.
Check that the hood lies smoothly and does not pull the back panel out of shape.
Adding the Fabric Lining
Place the right side of the lining fabric against the right side of the crocheted piece. Pin or clip the layers together.
Sew around the piece in one continuous seam, leaving the upper edge of the front flap open. Use this opening to turn the project right side out. Smooth the corners and close the remaining opening neatly by hand.
If the flap is made from lining fabric, it can also serve as the turning opening during assembly.
Adding the Zippers
Sew one separating zipper along each side, positioning the zipper tape on the inside of the lining. The original maker recommends using two rows of stitching so that each zipper is firmly secured to the fabric.
Open and close both zippers several times before finishing the seams to confirm that the crochet and lining do not catch in the zipper teeth.
Buttoned Version
If you are not using lining fabric or zippers, add buttons along the side edges. Make matching crocheted buttonholes or small fabric loops so that the front can be opened easily.
Space the buttons evenly and reinforce every attachment point.
Original Length Note
The original Dutch instructions state a total length of 1.50 m when the flap is made from lining fabric and 1.60 m when the flap is crocheted. These overall figures do not perfectly match the separate panel measurements printed on the diagram, so treat them as general guidance. Check the piece against the exact baby seat or stroller before sewing the lining or attaching closures.
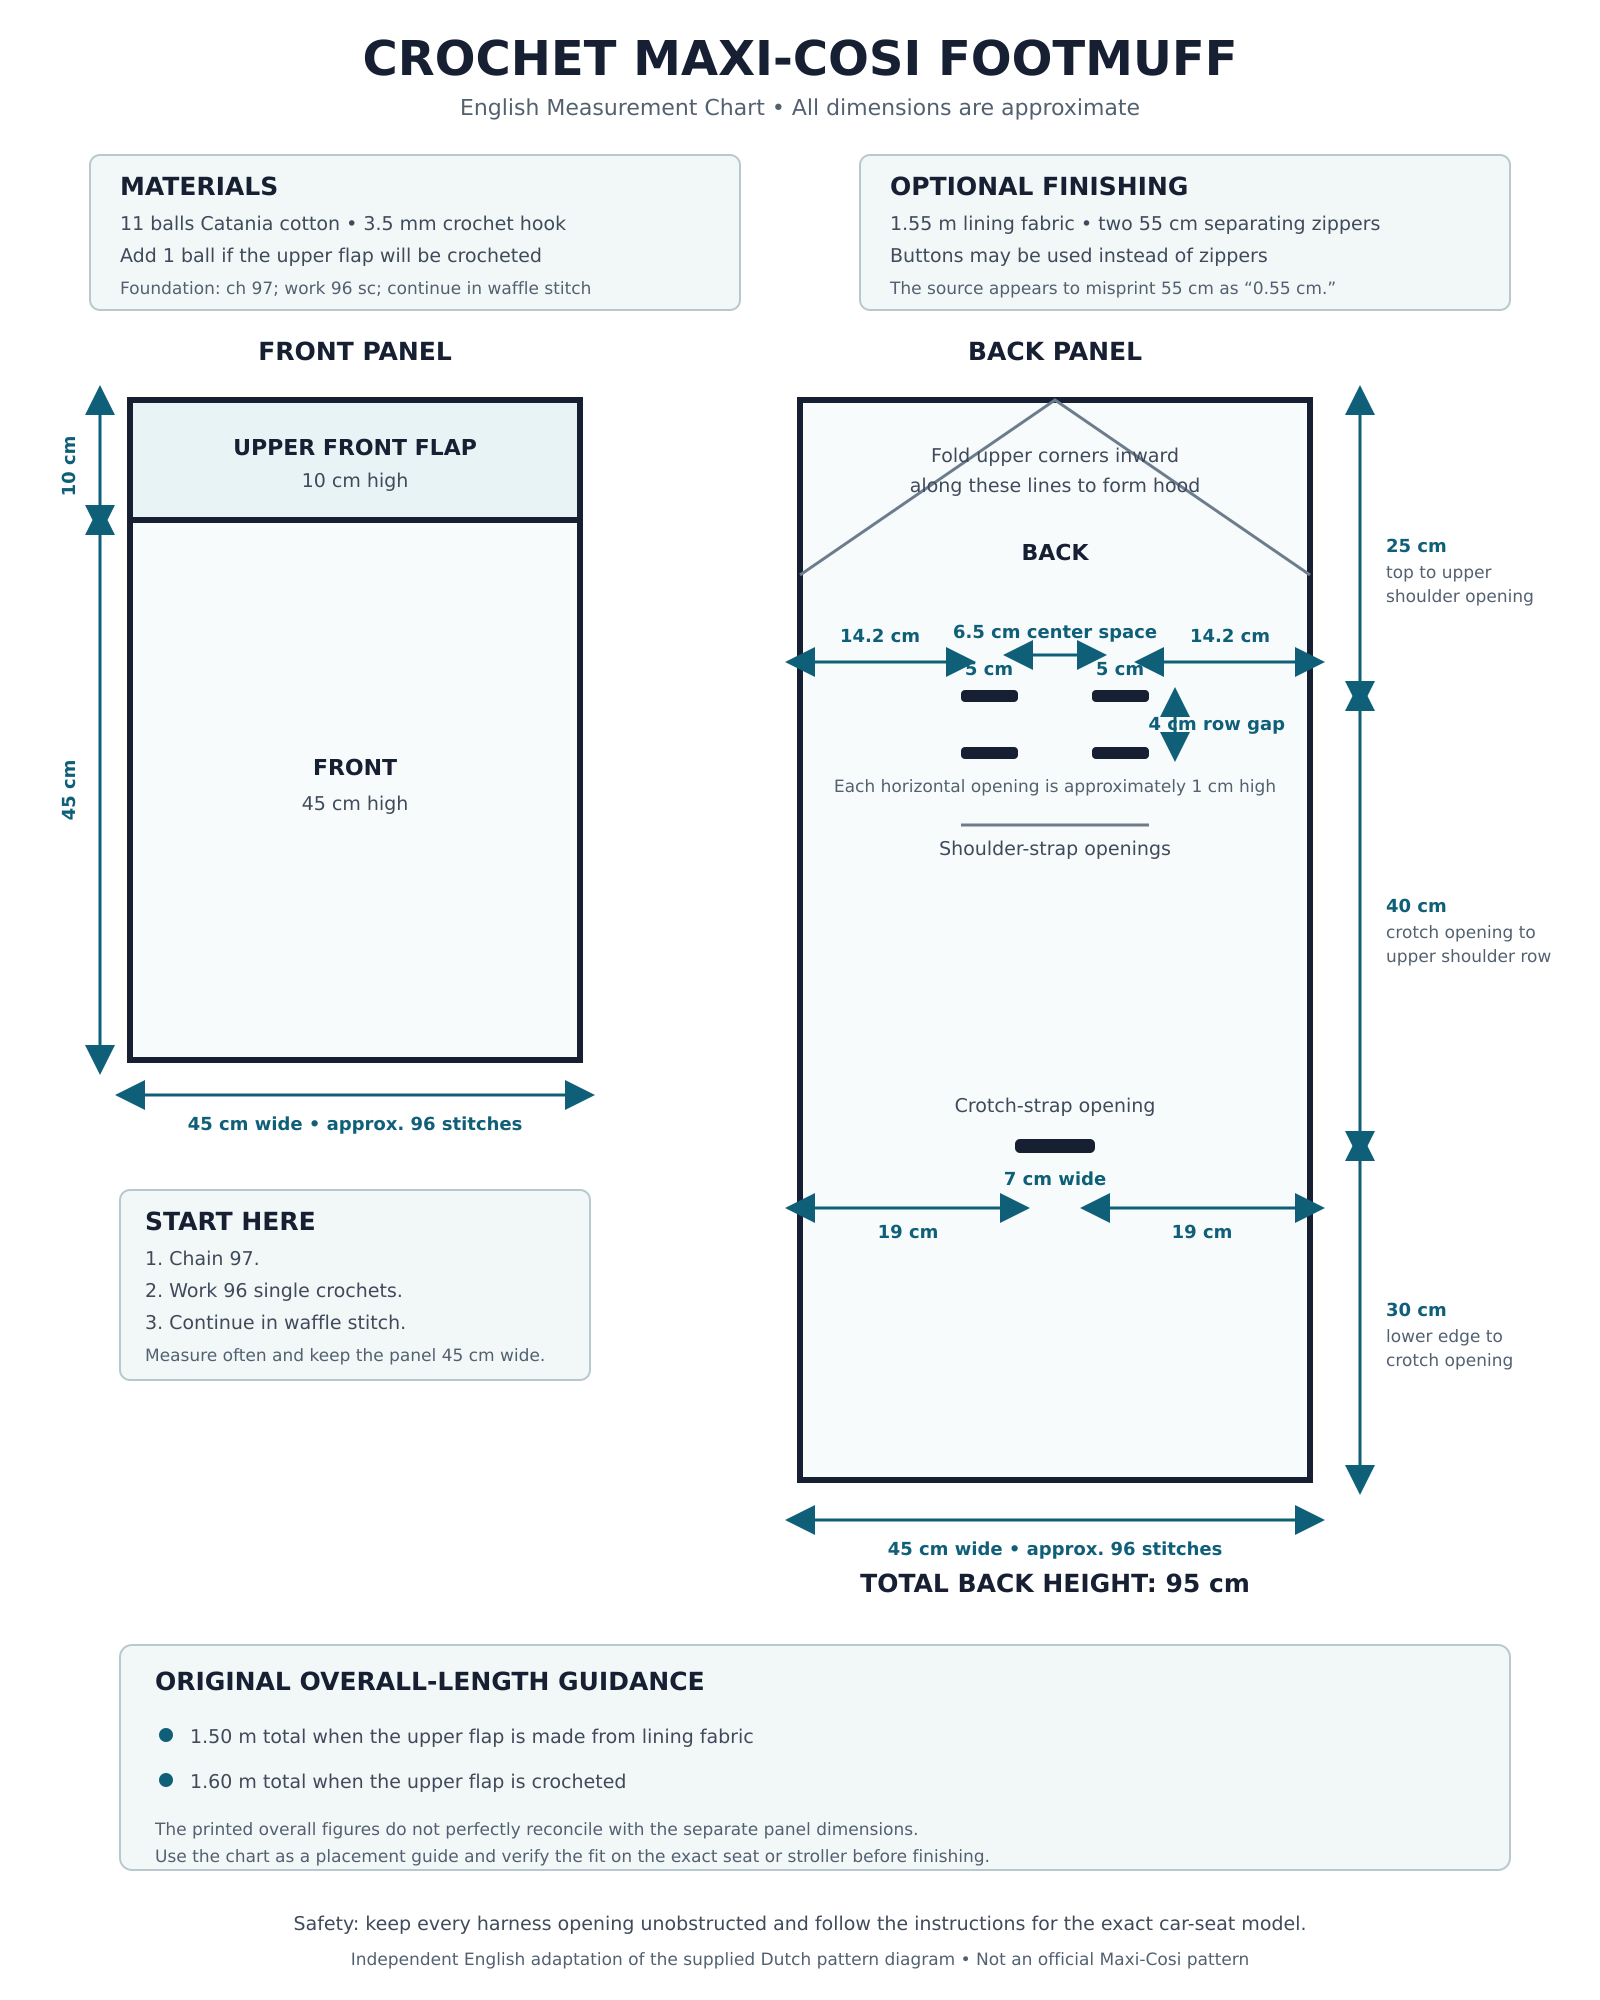
Diagram
Weave in all yarn ends securely. Check every seam, button, zipper and folded hood edge. Lightly block the crochet if needed, taking care not to stretch the harness openings out of shape.
The original maker intentionally made the finished footmuff a little larger so that it could also be used in a stroller.
This crochet Maxi-Cosi footmuff combines the cozy texture of waffle stitch with practical openings, an optional lining and convenient side closures. Careful measuring is the key to a neat result, especially around the crotch and shoulder straps.
Use the English chart below as your construction guide, check the fit frequently and customize the yarn or lining fabric to create a warm, beautiful project for cooler days.
You might also be interested
You Are Here: