This adorable 3D Bee Granny Square features a striped crochet bee with dimensional wings surrounded by a classic square border. The raised wings give the little bee a wonderful three-dimensional appearance, making this motif perfect for blankets, cushions, tote bags, baby projects, and spring or garden-themed crochet pieces.
3D Bee Granny Square Crochet Pattern
Written byadmin in
Finished Size
Approximately:
3.5–4 inches (9–10 cm) square
when made with DK/Sport weight yarn and a 3.0 mm crochet hook.
Materials
You will need:
DK or Sport weight yarn
Yellow yarn – Color A
Dark brown or black yarn – Color B
White, cream, or pale gray yarn – Color C
Background color – Color D
3.0mm crochet hook
Yarn needle
Scissors
You can easily make a larger block by using thicker yarn or adding extra border rounds.
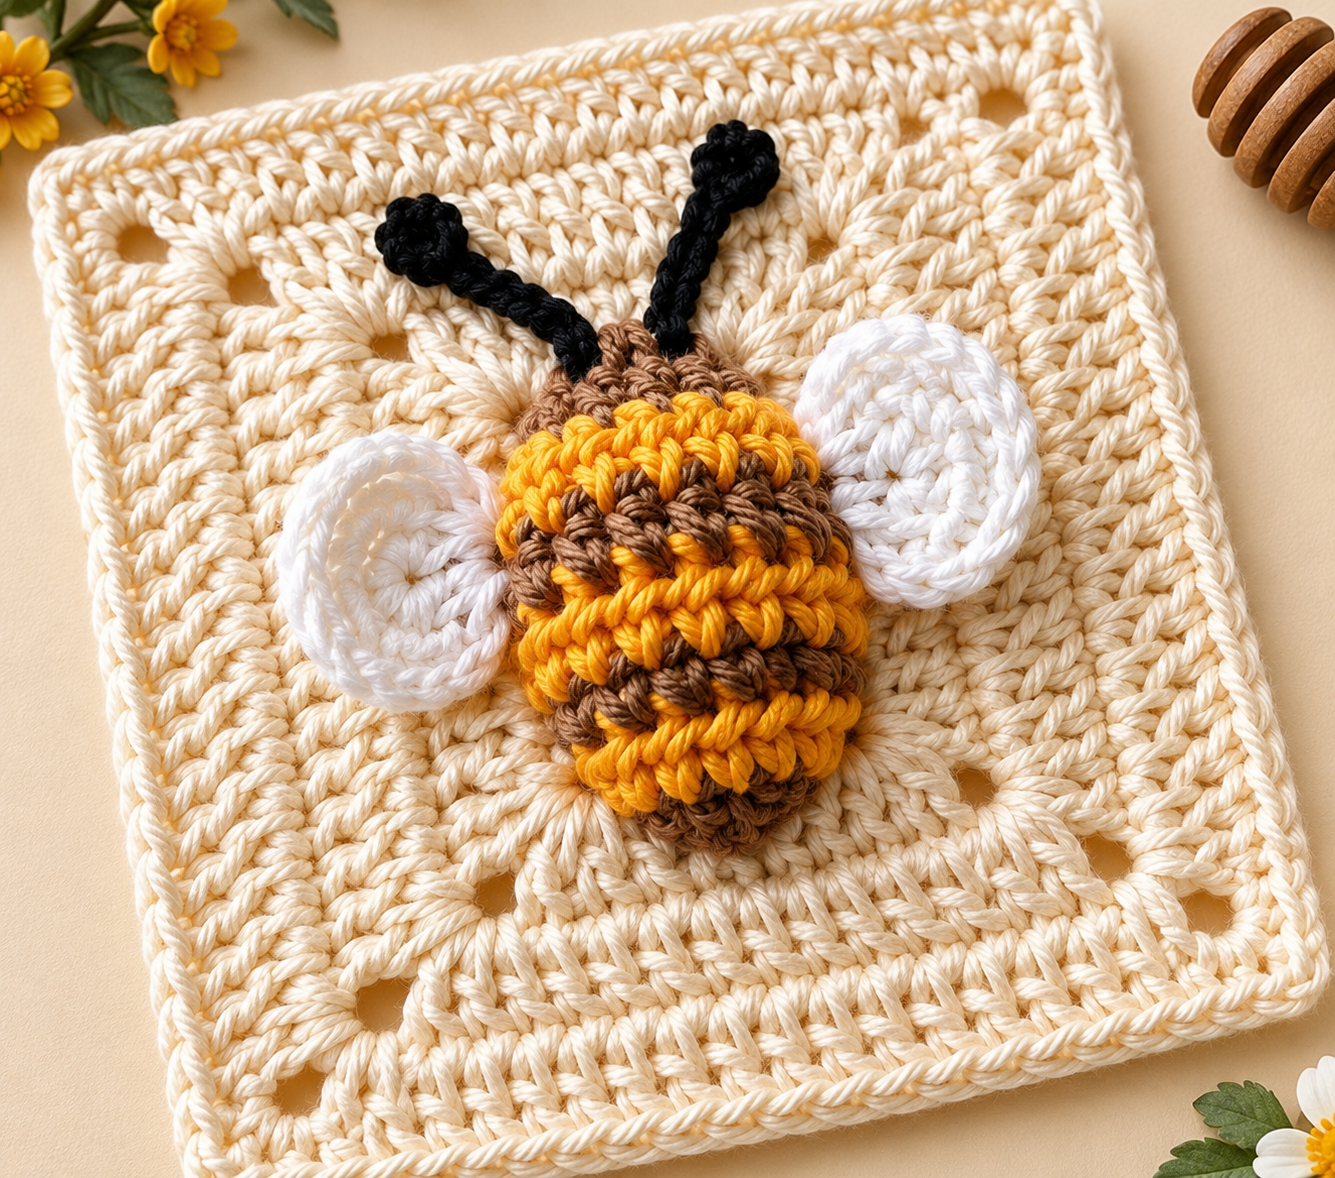
3D Bee Granny Square Crochet Pattern
US Crochet Abbreviations
ch – chain
sl st – slip stitch
sc – single crochet
hdc – half double crochet
dc – double crochet
tr – treble crochet
st / sts – stitch / stitches
inc – increase
tog – together
BLO – back loop only
TL – third loop
picot – picot stitch
sk – skip
FO – fasten off
Skill Level
Intermediate
The pattern involves color changes, decreases, working in the back loop and third loop, as well as shaping the bee before turning the motif into a square.
Special Stitches
sc inc: Work 2 sc into the same stitch.
dc inc: Work 2 dc into the same stitch.
sc2tog: Insert hook into next stitch and pull up a loop, repeat in following stitch, yarn over and pull through all loops.
Part 1 – Crochet the Bee Body
The bee is worked first and the granny square is constructed around it afterward.
Row 1 – Yellow
With Color A:
Ch 4.
Working back toward the beginning, skip the first 3 chains and work:
2 hdc into the remaining chain.
Ch 3.
Sl st back into the same base chain.
Fasten off.
This creates the first small yellow section of the bee.
Row 2 – Dark Stripe
Join Color B at the upper edge on the right side of the previous row.
Ch 1.
Work an sc increase into the same joining point.
Work:
1 sc in each of the next 2 stitches.
At the opposite edge, work another:
sc inc.
Fasten off.
You should now have a wider dark stripe across the bee.
Row 3 – Yellow Stripe
Join Color A at the right edge.
Ch 2.
Work 1 hdc into the same joining point.
Work:
1 hdc across the next 4 stitches.
Work 1 hdc into the final stitch.
Ch 2.
Sl st into the same edge stitch.
Fasten off.
The bee’s body should begin developing a rounded shape.
Row 4 – Dark Stripe
Join Color B at the top of the right ch-2 edge.
Ch 1.
Work:
sc2tog over the next 2 stitches.
Then:
1 sc in next stitch.
Work another:
sc2tog.
Then:
1 sc in next stitch.
Finish by working another decrease across the remaining stitch and the opposite edge.
Fasten off.
This row narrows the bee slightly.
Row 5 – Final Yellow Body Stripe
Join Color A at the right side.
Ch 2.
Work:
1 hdc in the same joining stitch.
Work:
1 hdc in each of the next 2 stitches.
Work 1 hdc in the final stitch.
Ch 2.
Sl st into the same edge stitch.
Fasten off.
The bee now has its characteristic alternating yellow and dark stripes.
Row 6 – Bee Head
Join Color B at the top of the right-hand ch-2 section.
Ch 2.
Across the next four stitches, work a tapered cluster using:
hdc, sc, sc, hdc
working the stitches together so they meet at the top.
Make a small ch-1 picot at the center.
Ch 2.
Sl st to the opposite side.
Fasten off.
This creates the small rounded head and pointed detail at the top of the bee.
Part 2 – 3D Bee Wings
The wings are worked directly onto the bee but only through the back loops. This allows them to sit above the surface instead of lying completely flat.
Right Wing
Using Color C, locate the ch-2 section on the right side of the upper yellow body row.
Work in BLO.
Join yarn in the back loop of the lower chain.
Ch 3.
Work:
1 tr in the same loop.
Make a small picot.
In the back loop of the upper chain work:
1 dc.
Ch 2.
Sl st into the same loop.
Fasten off.
The wing should naturally curve away from the bee.
Left Wing
Turn the bee so that you can work comfortably on the opposite side.
Join Color C in the corresponding ch-2 section.
Working in BLO:
Ch 2.
Work:
1 dc in the same loop.
Make a picot.
Work:
1 tr in the back loop of the upper chain.
Ch 3.
Sl st into the same loop.
Fasten off.
You should now have two dimensional wings.
The 3D wings are one of the defining features of this construction.
Part 3 – Turn the Bee into a Granny Square
Now the irregular bee shape is surrounded with stitches of different heights to create four straight sides and four corners.
Use Color D.
Position the bee right side facing you.
For this section, work mainly into the third loops along the bee’s outer edge.
This helps preserve the definition of the striped body.
Join near the right side of the upper dark section.
Ch 3, counting as the first dc.
Work another dc into the same space.
This forms a dc increase.
Then work:
1 hdc, 1 sc, 1 hdc, dc inc.
First Corner
Ch 3.
Continue along the next side with:
2 dc, 1 sc, 2 hdc, dc inc.
Second Corner
Ch 3.
Continue:
dc inc, 1 hdc, 1 sc, 1 hdc, dc inc.
Third Corner
Ch 3.
Continue:
dc inc, 2 hdc, 1 sc, 2 dc.
Fourth Corner
Ch 3.
Sl st into the top of the beginning ch-3.
You should now see a recognizable square surrounding the bee.
Part 4 – Granny Square Border
The following rounds are much simpler.
Join your background yarn in any corner.
Ch 3. This counts as the first dc.
Work 1 dc in each stitch across the side.
When you reach a corner ch-3 space, work:
2 dc, ch 3, 2 dc
into the corner.
Continue:
1 dc in every stitch along each side
and
(2 dc, ch 3, 2 dc)
in every corner.
Join with a sl st to the top of the beginning ch-3.
Additional Border Rounds
Repeat the same border round until your block reaches the desired size.
The tutorial’s sample continues the border until approximately Round 10.
For each new round:
Ch 3, dc across each side, and work (2 dc, ch 3, 2 dc) into every corner.
Join with a sl st at the end.
Fasten off after the final round.
Bee Antennae
Cut a length of dark yarn and thread it onto a yarn needle.
Bring the yarn through the top of the bee’s head.
Create two short diagonal stitches extending upward.
For the type of each antenna, make a small French knot.
Secure the yarn neatly on the back of the motif.
The antennae add a surprising amount of personality to the finished bee.
Blocking
Blocking will help give the granny square clean, straight edges.
Lightly dampen the finished block.
Shape it into a square and pin each corner.
Adjust the sides so they are equal.
Allow the block to dry completely.
Avoid flattening the wings while blocking you want them to remain dimensional.
Color Ideas
The traditional combination is:
Bee: yellow and dark brown
Wings: cream or white
Background: white or ivory
But this block can be incredibly cute in alternative palettes.
Try:
Honey Bee: mustard + chocolate + ivory
Pastel Bee: pale yellow + lavender + cream
Garden Bee: golden yellow + black + sage green background
Baby Blanket Bee: butter yellow + soft gray + pale blue
Modern Bee: gold + charcoal + off-white
Ideas for Using the 3D Bee Granny Square
A single block can become a coaster or small decorative appliqué.
Four blocks can create a beautiful pillow front.
Combine several blocks for a bee-themed baby blanket.
Alternate bee squares with sunflower or daisy granny squares for a garden blanket. The motif can also be used for tote bags, table runners, wall hangings, nursery décor, and spring projects.
Because the bee itself has an irregular shape, the first square-forming round may look slightly uneven while you are working it. This is normal.
3D Bee Granny Square Crochet Pattern PDF
The combination of sc, hdc, and dc stitches compensates for the different heights around the bee and produces straighter sides once the complete round is finished.
When working the wings, avoid making your stitches too tight. A slightly relaxed tension helps them stand away from the body and gives the project its characteristic 3D appearance.
You might also be interested
You Are Here: