A small crochet cat face is a charming way to personalize a handmade project. Pointed ears, openwork eyes, and a softly rounded chin give this motif its character. Use a single cat on a tote bag or make several in coordinating colors to decorate blanket squares, cushions, and gift wrapping.
Crochet Cat Face Appliqué
Written byadmin in
The instructions below translate the supplied illustrated chart into US crochet terminology. This chart is a different version from the short video: its ears begin with four chains. Follow the chart version consistently.
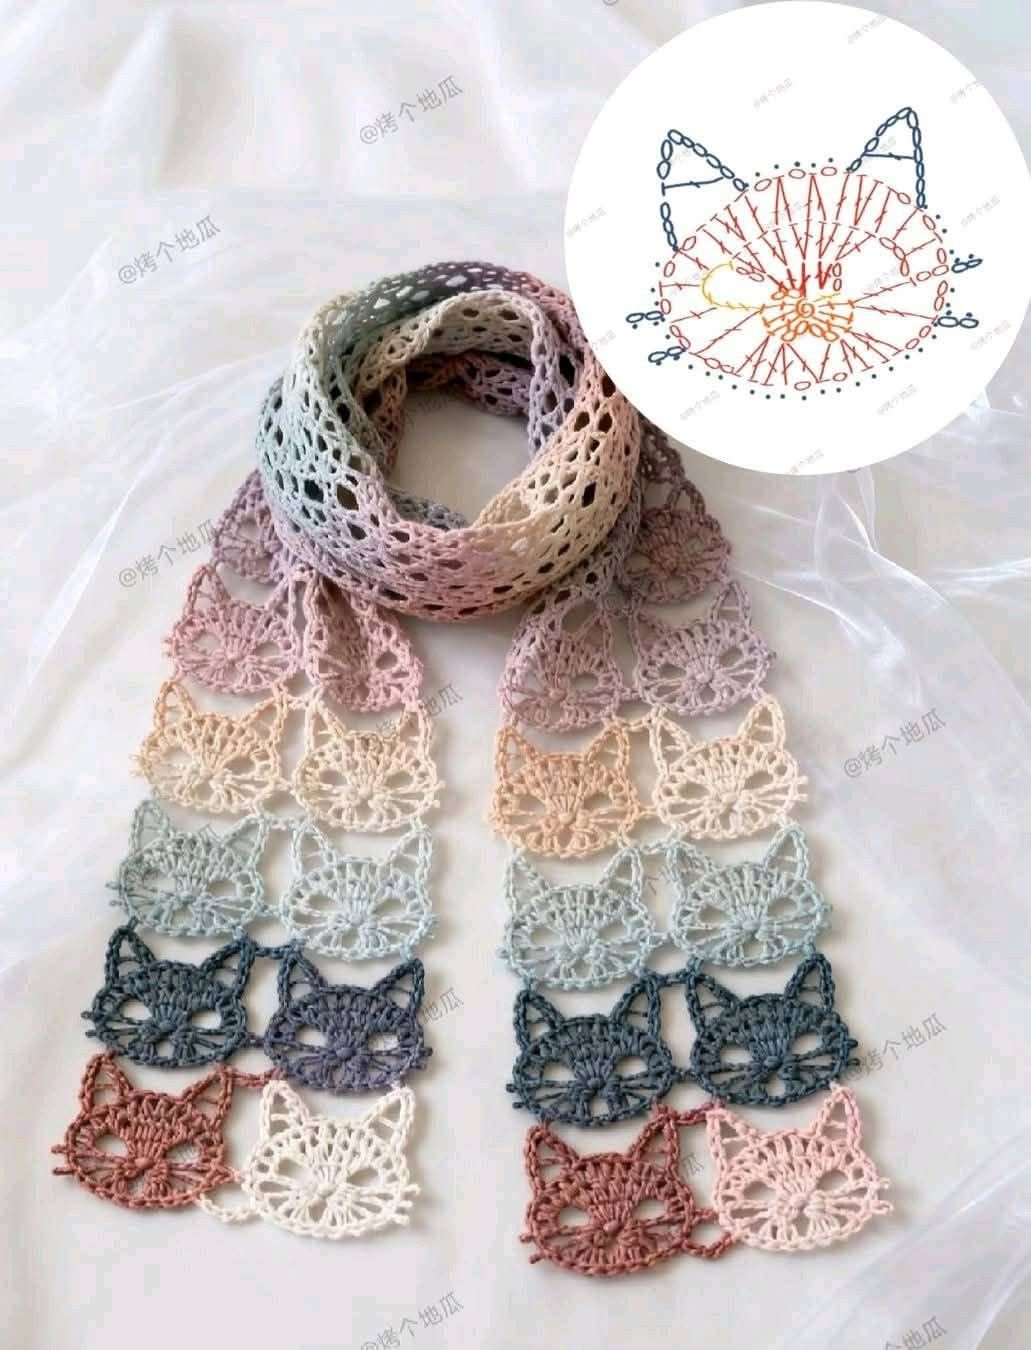
Crochet Cat Face Appliqué
Materials
- A small amount of yarn in your preferred color
- A crochet hook suited to your yarn
- Two stitch markers
- Scissors and a yarn needle
Smooth yarn makes the stitch shapes easier to see. Choose a hook that produces a fabric firm enough to hold the ears while keeping the chains flexible.
Size and Skill Level
The source does not specify yarn weight, hook size, gauge, or finished dimensions. Size will vary with your materials and tension. This project uses tall stitches, increases, slip stitches, and small shaped sections; familiarity with these techniques is helpful.
Abbreviations — US Terms
| Abbreviation | Meaning |
|---|---|
| ch | chain |
| sl st | slip stitch |
| sc | single crochet |
| hdc | half double crochet |
| dc | double crochet |
| tr | treble crochet; yarn over twice before inserting hook |
| dtr | double treble crochet; yarn over three times before inserting hook |
| dc inc | 2 double crochet stitches in the same stitch |
| st / sts | stitch / stitches |
Before You Begin
This is a translation of the supplied chart, not a sample-tested pattern. The source refers to markers 1 and 2 without clearly labeling their exact positions, and its second stage does not fully explain the starting setup or every insertion point. Keep the original diagram beside the translation; these details still need confirmation before the instructions can serve as a standalone pattern.
The green chain framework around the cat has no written counts in the source. It is not included in the translated cat instructions.
R1 — Center and Face
Make a magic ring. The written sequence is:
- Ch 6, work 7 tr, ch 2.
- Work 1 tr, ch 5.
- Work 1 dtr, ch 2.
- Work 2 tr, 4 dc, and 2 tr.
- Ch 2, work 1 dtr, ch 2.
- Work 1 dc, then sl st at marker 1.
The diagram shows the tall stitches radiating from the center ring. Leave enough room in the ring to arrange them before gently tightening it. The precise chain used for the closing join is not identified in the written instructions.
R2 — Upper Head
The written sequence is:
- Work 2 dc increases.
- Work 1 dc in each of the next 2 sts.
- Work 1 dc increase.
- Work 1 dc in the next st.
- Work 1 dc increase.
- Work 1 dc in each of the next 2 sts.
- Work 2 dc increases.
- Sl st at marker 2.
Two dc increases mean two increase units, producing four dc in total. Read this sequence alongside the chart for placement. It produces 17 dc if every increase is worked as 2 dc; the source does not supply a separate stitch total or explain additional setup stitches.
R3 — Outline and Ears
- Make 1 starting chain and place a marker.
- Work 22 sl sts along the outline.
- Ch 4; work 1 sc, 1 hdc, and 1 dc to form the first ear.
- Work 4 sl sts along the outline.
- Ch 4; work 1 sc, 1 hdc, and 1 dc to form the second ear.
- Work 3 sl sts, join at the marker with a sl st, and fasten off.
Ear placement note: The usual way to work the three ear stitches into a four-chain strand is to begin in the second chain from the hook: sc, hdc, then dc in successive chains. This is an interpretation of the drawn ear, rather than an insertion instruction explicitly written in the source. The attachment points on the head should be checked against the diagram.
Finishing
Weave the ends into the back of the appliqué. Lay it flat and gently shape the ears. If your yarn allows it, light blocking can help settle the outline. Keep the slip stitches relaxed; pulling them too tightly may make the face cup or curl.
For an optional finishing touch, embroider a tiny nose or short whiskers with contrasting yarn. Keep these additions light so the openwork eyes remain visible. When sewing the motif onto a base, use small stitches around its outline and avoid pulling the fabric out of shape.
Color and Project Ideas
Blush pink gives the cat a soft look, while cream, gray, and ginger shades echo familiar coat colors. For a playful collection, choose several colors from the same yarn range so the motifs have similar thickness and texture.
Attach one cat to a pocket or arrange several on a cushion front. You can also sew the finished motif onto a separately made granny square. Make one sample first to check its proportions against your intended project before crocheting a whole set.
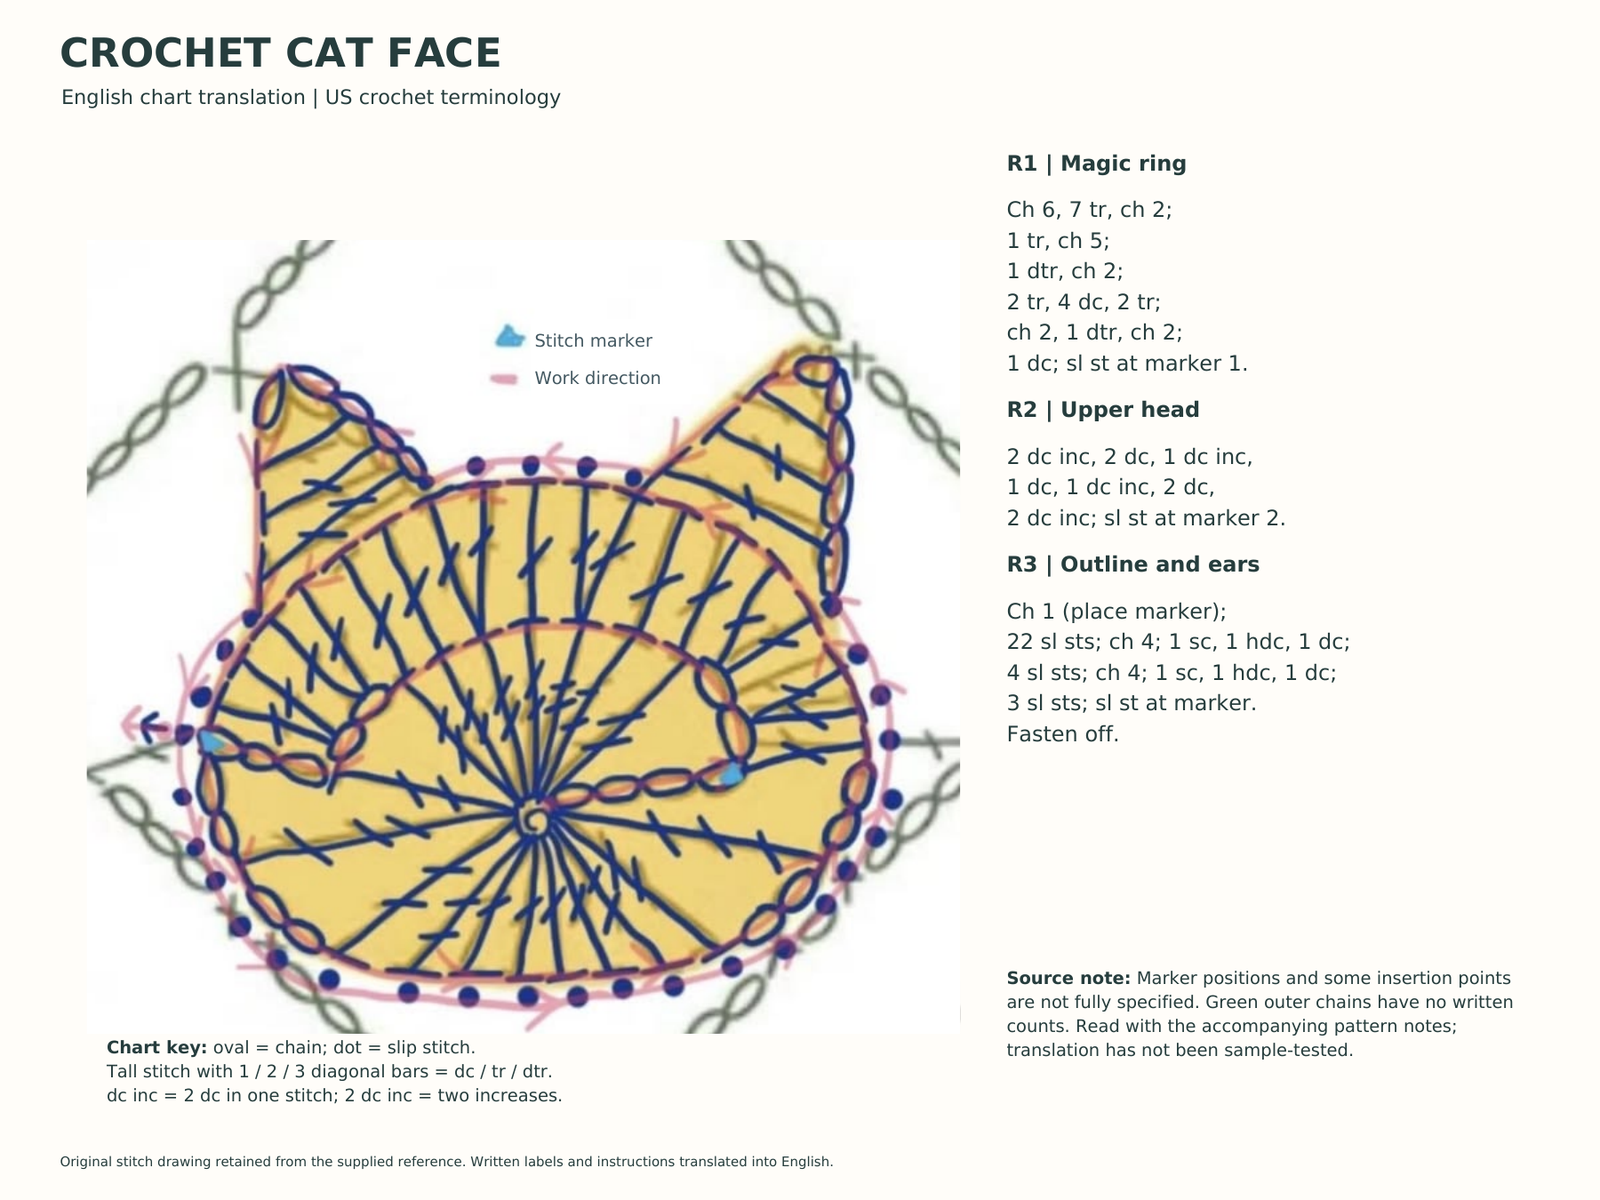
Diagram
This little cat uses open spaces and changes in stitch height to create an expressive shape. The English chart makes the source easier to follow and gives you a clear reference for the stitch names. Use it with the notes above, keeping the unresolved joining and placement details in mind when making your first sample.
You might also be interested
You Are Here: