Soft neutrals and crisp contrast give the Simply Serene Quilt its distinctive rhythm. Printed squares sit on point, while black-and-white triangles create small flashes of movement between them. A narrow cream border catches the light, and a wider dark frame brings the whole composition together. The result is a quilt that can feel quiet from across the room and richly detailed when viewed up close.
Simply Serene Quilt
Written byadmin in
The downloadable guide accompanying this article develops a photo-based version measuring approximately 63 x 75 3/4 inches (160 x 192.4 cm). It includes a complete cutting schedule, a numbered placement map, diagonal row sequences, and instructions for the borders, backing, and binding. This is a generous throw size; check the measurements against your furniture if you would like to use it as a bed accent.
The reference image matches the published Simply Serene design by Diana Beaubien for Pleasant Valley Creations. The companion PDF is an independently calculated reconstruction, with its own measurements and diagrams; it is not the designer’s official pattern. Its counts and geometry have been checked, but this edition has not been sewn and tested. The designer’s original pattern is linked below for readers who prefer the official instructions and size options.
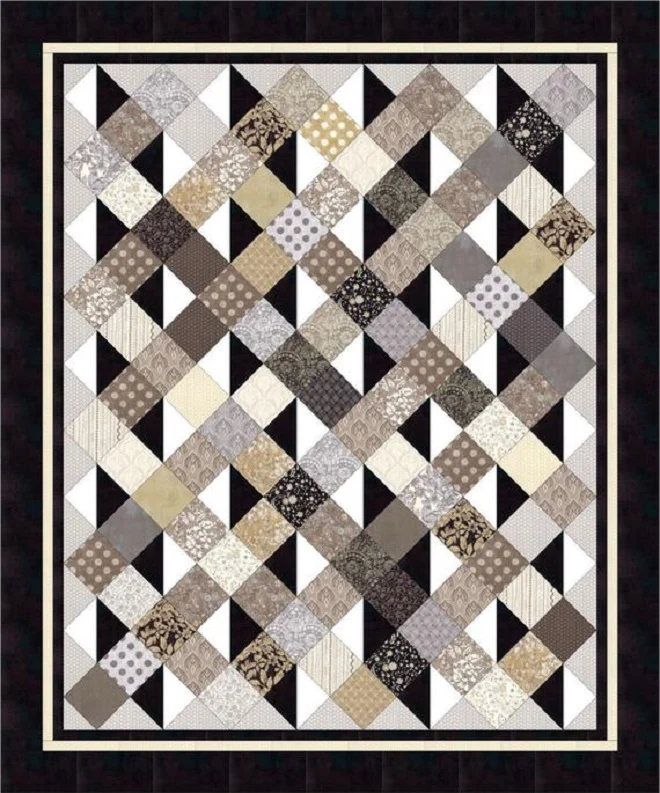
Simply Serene Quilt
Begin with a selection of taupe, cream, stone, soft gray, and charcoal prints. Small florals, dots, stripes, and understated geometric designs can sit comfortably together when their colors share a similar mood. Vary the darkness of the prints so neighboring squares remain visible. The aim is a gentle mix of fabrics with enough distinction to keep the diagonal arrangement clear.
This version uses 103 print squares cut at 5 inches. Three 42-piece charm packs provide 126 squares, giving you some choice as you arrange the layout. Ten fat quarters are another option, provided each has at least 15 x 20 inches of usable fabric for cutting twelve squares. Keep the extra pieces nearby so you can swap out any print that feels too bright or too similar to its neighbor.
Let the Triangles Create the Movement
The contrast comes from 40 half-square-triangle units, each trimmed to 5 inches before assembly. In the upright quilt, 20 have black on the right and 20 have black on the left. Those orientations matter: rotating a unit changes the direction of the visual pattern. Make the triangles slightly oversized, press them carefully, and trim each one with the ruler’s diagonal line directly over the seam.
Lay out the entire center before sewing. Photograph the arrangement, then label the diagonal rows so their order survives the move from your design wall to the sewing machine. The numbered map in the PDF identifies every print position, while the row chart records the triangle sequence. These two views make it easier to check both the fabric balance and the direction of the dark shapes.
Sew the On-Point Center with Care
The center is assembled in 17 diagonal rows. Gray setting triangles fill the spaces along its edges, and four corner triangles complete the rectangle. The cutting method places straight grain around the outside of the quilt, but the edges being joined still need gentle handling. Support each row, lift and set the iron instead of sliding it, and pin the intersections before sewing.
Once the center is complete, square it without cutting into the seam allowance beyond the outer points. The reconstruction includes a small allowance for squaring and a measurement checkpoint before the borders are added. If your sewn center differs from the target, use its measured dimensions to adjust the border lengths. A flat, accurately measured center is more useful than forcing the fabric to match a number.
Frame and Finish the Quilt
The three borders finish at 1 inch in black, 1 inch in cream, and 4 inches in black. Sew the side borders first for each round, followed by the top and bottom. Cut opposite borders to the same measured length and mark their centers before pinning. This simple routine helps the frame stay balanced around the patchwork.
For quilting, a soft diagonal grid can echo the on-point squares without competing with the prints. A gentle allover texture is another possibility. Test the thread on scraps that include both the light and dark fabrics, and follow the batting manufacturer’s spacing requirements. Finish with the dark binding to carry the outer frame neatly around the edge.
Color placement gives this quilt much of its personality. A warmer selection of beige and brown prints will create a different mood from cool grays and silver tones, even when the layout stays the same. Before stitching, step back from the design wall and look for groups of similar values. A few thoughtful swaps can make the whole surface feel more balanced.
Simply Serene Quilt PDF Pattern
Download the companion Simply Serene Quilt reconstruction PDF for the cutting list, measurements, numbered diagrams, and assembly instructions. Work through a trial seam and a pair of triangle units first, then enjoy building the quilt one diagonal row at a time. Which neutral fabrics would you choose for your version?
You might also be interested
You Are Here: