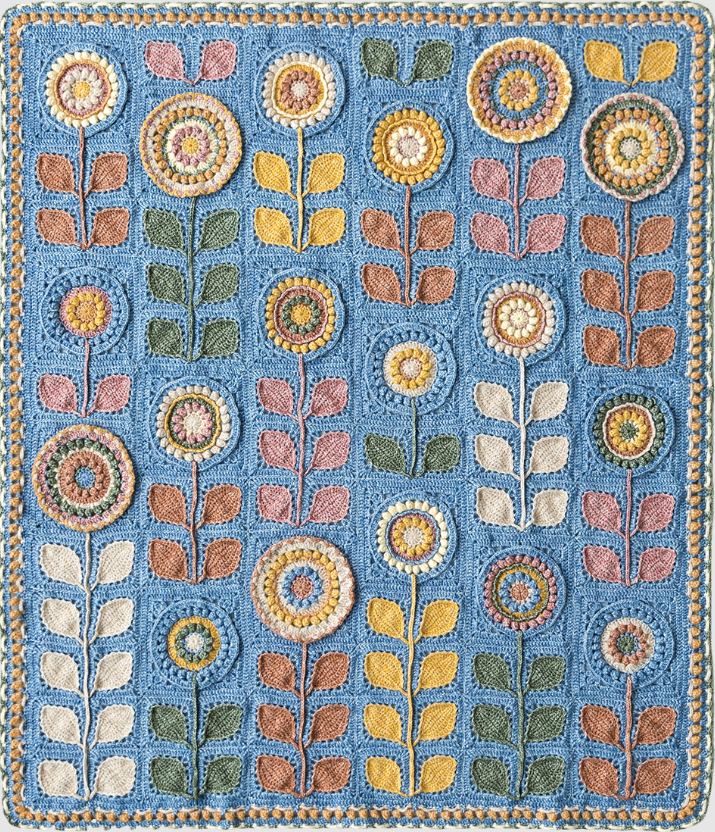
Look closely at the Navia Flower Blanket and you’ll see how each little plant takes shape. A round of popcorn stitches forms the flower, two smaller squares tilt their leaves toward each other, and a crocheted cord connects the bloom to the leaves. The stems go on last, so you get to watch a collection of colorful squares turn into a garden as you sew.
Navia Flower Blanket Crochet Pattern
Written byadmin in
Designed by Susan’s Family for its Northern Europe series, the finished blanket measures approximately 37½ × 43¼ inches (95 × 110 cm), including the border. The free English PDF at the end of this article includes round-by-round instructions in US crochet terms, stitch charts, color tables, and a layout showing where every piece belongs.
Before you make a stack of motifs, crochet one complete flower square and two leaf squares using the yarn and hook you plan to use throughout. The original sample uses Susan’s Family Impression Misty Feather yarn and a 3 mm hook. You’ll also need a tapestry needle, scissors, and a few stitch markers for assembly.
Navia Flower Blanket Crochet Pattern
Lay the two leaf squares side by side along one edge of the flower square. The flower should measure about 5½ inches (14 cm) across, and each leaf square should measure about 2¾ inches (7 cm). With the pieces resting flat, the outside corners should line up. If you have to stretch one piece to make the corners meet, check the stitch counts and your tension before making the remaining motifs. This little trial is especially helpful here because the same join appears throughout the blanket.
Each leaf begins with a chain of 14. As you work along the first side of that chain, the change from single crochet to taller stitches gives the leaf its curved edge. At the far tip, rotate the piece so you can crochet back along the underside of the same foundation chain. If you tend to lose track of the tips on small oval motifs, place a removable marker in the middle single crochet of each three-stitch tip. Those markers make the increases easier to find on the next round.
What makes the three flowers different?
The pattern includes five A1 flowers, nine A2 flowers, and four A3 flowers. All three styles begin with a circular center and finish with the same square frame. The differences lie between those two stages, in how the chain arches sit around the popcorn stitches.
A1 is a good flower to make first. As you work its second layer of arches, you hold the previous arches alternately in front of and behind your hook. A2 changes that small movement. You keep the earlier arches in front all the way around, leaving the new layer tucked behind them. In A3, the outer popcorns go directly into the existing arches. Once you’ve tried all three, lay them next to each other and run a finger around the petals. It’s easier to recognize the different layers by touch than by looking at the stitch symbols alone.
One detail matters in every flower. After closing a popcorn, chain one to secure it, then work the spacing chains called for in the round. Counting that securing chain as part of the space shortens the arch you’ll need on the next round.
Choose your background before sorting the flower colors
The pattern offers two background options, Bleached Sand and Silver Lake Blue. The background yarn frames each flower and leaf, so its color carries from one square into the next. If you’re deciding between the two, lay a finished flower center on top of each background yarn. Look at the outermost round of petals, where the flower and frame will actually meet.
When reading the color tables, keep an eye on the difference between a combination and a shade. “Color 1” at the top of a column identifies one complete version of a motif. Read down that column to find the individual shade for each round. A small paper label such as “A2, Color 1” pinned to the finished square will tell you exactly where it goes when you reach the layout page.
Arrange the leaves before threading your needle
There are 96 leaf squares, and each leaf runs diagonally across its square. Turn two squares so the bases of their leaves meet and the tips open upward into a V. That meeting point is where you’ll attach the stem. Since the squares fit together in more than one orientation, it’s worth laying out a whole flower and its leaves before sewing the first seam.
The lower-right corner is a practical place to begin. Find the A3 flower with four leaf squares beneath it on the layout. Sew the leaves into pairs, then join the pairs. When you attach the flower, match its outside corners to the outside corners of the two leaves and mark the midpoint. At the center seam, each leaf contributes a corner chain. Sew those chains to two consecutive stitches on the flower edge, one chain to each stitch. That small detail keeps the junction flat.
Finish the border, then fit each stem
The seven-round border picks up the popcorns and interlaced arches used in the flowers. In the first round, pay attention to the seams between motifs. The pattern uses a taller treble crochet at each seam to reach into the join. Once you’ve worked past a few joins, lay the edge down and check that it runs evenly across them.
Save the stems until the blanket is assembled and bordered. Make the double-chain cord and lay it along its intended path, from the meeting point of the leaves to the base of the flower. Check the length with the blanket resting flat before cutting the yarn. A cord that fits without stretching is much easier to sew down, and the flower will stay where you placed it when you lift the finished blanket.
Download the free Navia Flower Blanket pattern
The 15-page English guide includes the written instructions and charts for all four motifs, both color palettes, the layout for all 114 pieces, and directions for the border and stems. If you’re printing only the pages you need as you go, keep page 7 handy while making the flowers. It contains the square frame shared by A1, A2, and A3.
When you square off a flower, the stitches that form the frame reach behind the petals. On the first frame round, look for the green lines on the chart. They show where your hook needs to reach down around a popcorn from an earlier round. After working the first quarter of the flower, pause and count six chain arches. Turn the flower right side up, too. The arches should sit behind the bloom, with the popcorns still visible on the front.
Download the free Navia Flower Blanket crochet pattern (PDF)
As you finish the leaf squares, keep the short four-chain extension from Round 3 free. It’s easy to mistake it for an end that’s ready to weave in. Once a pair of leaves is sewn together, bring both extensions through the same junction to the wrong side, taking care to keep the chains untwisted. This draws the two leaf bases neatly together at the spot where the crocheted stem will begin.
On the border, pay attention to which round receives your hook. In Round 3, the single crochet stitches reach back into the double crochets of Round 1. The five-chain arches from Round 2 stay loose so you can pass them alternately in front of and behind the new arches. After a few repeats, spread the edging across your fingers. You should be able to trace each strand separately and see the two layers crossing between their anchor points.
You might also be interested
You Are Here: